Showing posts with label Paper Pretties. Show all posts

Sunday, November 30, 2014

Christmas Blessings Goodie Bags

Hello Friends!  Well, you shouldn't be surprised to see these, so let's just get right to it! I posted two of the goodie bags HERE. And then I received an e-mail request for 12 of them! They are to be used as table favors for a Christmas Bunco. I was ALLLLL over that! I got busy right away and did a quick Google search for a Christmas Blessings mix and then it was game on!


Again, using the Lawn Fawn Goodie Bag die, made quick work of cutting my bag shape. I set everything up and just went at it assembly line style. I did the same steps for these as I did on the previous bags. But with these, I added the Christmas Blessings Mix poem onto the back.

Click to enlarge

I came up with two versions. There are several out there online, but these two fit my needs.

Version One:
Bugles: Bring us the joyful message of the Heavenly Host, announcing peace on earth, good will to men. Pretzels: Symbol of a mother’s loving arms. Mary wrapped her Son in swaddling clothes and laid Him in the manger. Red Hots: Red berries that decorate the holly plant, a reminder of eternal life and Christ’s redemption. Peanuts: The promise of a future harvest, one we will reap only if seeds are planted and tended with diligence. Dried Fruit: Reminds us of the rich gifts brought by the Wise Men. M&M’s: Memories of those who came before us to guide us to a blessed future .
Candy Cane: The shepherd's crook brings back sheep strayed from the fold. It reminds us to reach out and help others. Hershey’s Kiss: The love of family and friends that sweetens our lives.

Version Two:
Bugles: To remind us of the angels we have heard on high. Pretzels: Arms folded in prayer, a freedom sought by those who founded our country. Red Hots: Symbols of holly berries that decorate our wreaths. Peanuts: To remind us to plant the seeds for peace on Earth. M&M’s: Memories of those who came before us to lead us into a blessed future. Candy Cane: The shepherd’s crook, reminds us to reach out and help others. Hershey’s Kiss: The love of family and friends that sweetens our lives.

I added a bit of sparkle and shine with a clear Wink of Stella glitter brush pen on the bow, a clear Stardust pen on the wreath and Xmas Red Stickles to create the "berries". Although, very faint here, you can get a glimpse of the tone on tone background stamping I did with Versamark ink. This creates interest without taking attention from the main image.


And that is all I have to share with you today. I still can't believe it's December already! But, ready or not, here comes CHRISTMAS!!

Thanks for stopping by. I appreciate the visit.

Blessings~


supplies~
digital image: Pre-Colored Happy Holidays Wreath(MelJen's Designs)
stamp set: Be Joyful(Simon Says Stamp)
card stock: Pure Poppy(Papertrey Ink)  Real Red, Whisper White(Stampin' Up!) Candy Necklace(Bazzill)
specialty paper: Premium Presentation Paper Matte(Epson)
patterned paper: Snow Day 6x6 Petite Paper Pack(Lawn Fawn)
dies: Goodie Bag(Lawn Fawn)  Classic Circle, Scallop Circle Nestabilities(Spellbinders)
other: White embossing powder(Hero Arts)  Clear Wink of Stella Glitter brush(Zig)  Clearstar Gelly Roll pen(Sakura)  4x6 Cellophane Bags(Stampin' Up!) Xmas Red Stickles(Ranger)  "Joy" ribbon(Offray)

Thursday, November 6, 2014

Petite Christmas Purses

Hello Friends! I took a little break from my Goodie Bag die, but I still made a bag of sorts. This time I used the Petite Purse die from Stampin' Up! These sweet little purses will be used to hold a small gift and to serve as table favors at a Christmas Tea next month. I think the ladies will like them!


I created these assembly line style, so I could crank them out quickly. For some reason, the vanilla purses gave me FITS. The red card stock was fine, but not that vanilla! Yikes! This project involved lots of die cutting, lots of punching, lots of gluing and lots of patience!


After die cutting the bags, I die cut more card stock to use as front panels and I also die cut the patterned papers. I embossed the front panels to add a bit of texture and I inked around the edges. I also embossed the handles of each purse. After I assembled the bags, I added the floral embellishment to finish them off.

That's it for me today. Thanks for stopping by!

Blessings~


supplies ~ All supplies are from Stampin' Up! others are noted
card stock: Very Vanilla, Cherry Cobbler, Gumball Green
patterned paper: Be of Good Cheer-retired
ink: Cherry Cobbler, Crumb Cake
punches: Boho Blossoms, Itty Bitty Shapes Punch Pack
dies: Petite Purse BigzL
bling: Rhinestone Brads
other: Vintage brads  Textile embossing folder(Provo Craft)

Monday, November 3, 2014

Thanksgiving Blessings Mix Goodie Bags

Hello Friends! I'm back today with yet another goodie bag! I've gone goodie bag crazy! I wanted to make thank you gifts for some really nice people that my family has been working with for the last several months. And this is what I came up with...


I selected several Autumn toned card stocks and die cut them with the Lawn Fawn Goodie Bag die. And before assembling them, I stamped them using Versamark ink and a leaf themed stamp set to create a background. I die cut the little banner from Vanilla card stock, lightly sponged the edges then added my sentiment using Versamark and embossing powder. I used Early Espresso from Stampin' Up! and Liquid Platinum from Ranger. LOVE the Liquid Platinum color!


Next, I die cut the stitched leaves, and using sponge daubers and Distress Ink, I added layers of color until I achieved my desired results. In this picture here, you can see that I tested four colors of inks. But, I ended up using SIX! I sprayed the leaves with my homemade shimmer spray and while they were still a little damp, I manipulated them a bit, to coax them to curl, to add dimension. They are adhered to the greeting banner with foam tape.


I decided to fill the bags with treats. And I remembered that every year, Angie Juda from Chic n' Scratch blog makes cute boxes and fills them with a Blessing Mix. A quick Google search resulted in finding a plethora of blessing mix recipes. I selected one and formatted it in Microsoft Word to where I could fit several on a page for easy printing. I also made it a size that could be die cut with a square Nestie. Hey, I needed to make twenty plus of these bags and I was looking for short cuts! After I printed them out, I die cut and dry embossed them and lightly sponged the edges. I adhered them down flat on the back of the bags.


If you're not familiar with the Thanksgiving Blessings Mix, it's just an assortment of snack foods that each have a particular meaning/blessing. The little poem explains what each food represents. It's really cute and I discovered that there is a Blessings Mix for Christmas, too. Hmmmm....*wink*

Here is a generic photo of the ingredients.


For my bags, I used the Fall mix of M&M's and the Fall wrapped Hershey's Kisses. And instead of sunflower seeds, I used peanuts. If you do a Google search for this, you will find many more ways of putting it together. I saw one that used sunflower seeds still in the shell. I thought that was a really good idea, too.


Here is the version of the Blessings Mix that I used. Again, there are many others online.

Bugles: Shaped like a cornucopia or Horn of Plenty, a symbol of our nation’s abundance.
Pretzels: Arms folded in prayer, a freedom sought by those who founded our country.
Candy Corn: Sacrifice of the Pilgrims’ first winter, settlers survived on a few kernels of corn a day.
Nuts or Seeds: Promise of a future harvest, reaped only if seeds are tended with diligence.
Dried Fruit: Harvest gifts of our bountiful land.
M&M’s: Memories of those who came before us to guide us to a blessed future.
Hershey’s Kiss: The love of family and friends that sweetens our lives.

I used the 4 x 6 cellophane bags from Stampin' Up! for my treats and I tied them off with Gold Sparkle Hemp Cord from Lawn Fawn. And that was that!

Thank you for visiting me today. I appreciate the visit. Have a wonderful week.

Blessings~


supplies~
stamp sets: French Foliage(Stampin' Up!)  greeting-Friendship Jar Fall Fillers(Papertrey Ink)
card stock: Very Vanilla, Cajun Craze, Baked Brown Sugar, Summer Sun, Always Artichoke, Cherry Cobbler(Stampin' Up!)  Sweet Corn, Sweet Mango(GinaK Designs)  Dark Chocolate(Papertrey Ink)
ink:Versamark(Tsukineko)  Vintage Photo, Scattered Straw, Spiced Marmalade, Dried Marigold, Wild Honey, Rusty Hinge Distress inks(Ranger)  Bamboo(Close to My Heart)
dies: Goodie Bag, Stitched Leaves, banner for greeting-Stitched Journaling Card(Lawn Fawn) Classic Square Nestabilities(Spellbinders)
other: Early Espresso embossing powder(Stampin' Up!)  Liquid Platinum(Ranger)  Gold Sparkle Hemp Cord(Lawn Fawn)  4x6 Cellophane Bags(Stampin' Up!) shimmer spray(Blessed Designs by B.)

Friday, October 31, 2014

Happy Halloween!

Hello Friends! Happy Halloween! I've got a few things to share with you today...let's jump right in.

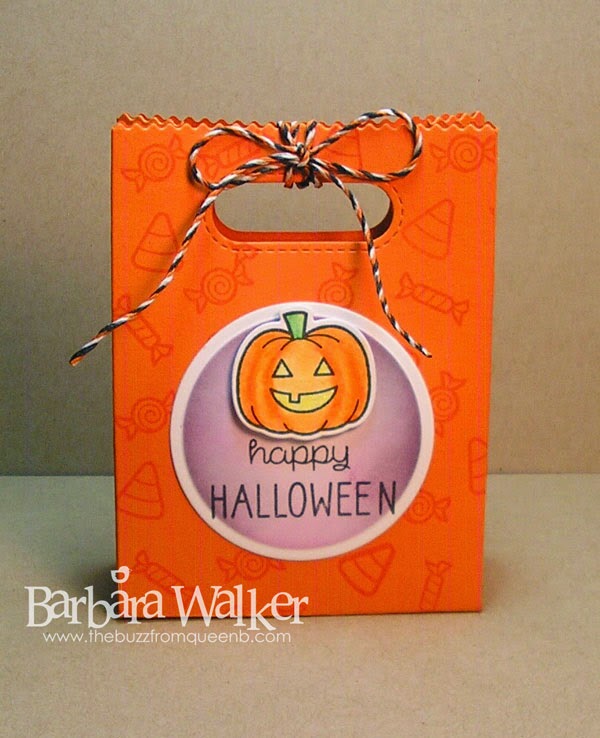
I am really putting some miles on the Goodie Bag die from Lawn Fawn. LOVE that thing! So, for Halloween, I made these...


After die cutting the card stock, I assembled the bags. I stamped the sweet little jack-o-lantern onto Neenah paper and colored them with colored pencils from the Spectrum Noir Essentials set. I blended the pencil with gamsol and added clear Wink of Stella to the eyes and mouth. Then, I die cut the pumpkins using the coordinating Lawn Fawn die. I love LF dies, because they cut the images perfectly, leaving just a slight white border. SO CUTE! Next, I die cut the circles and sponged on Distress Inks while they were still in the die. I like the crisp white border I get when I do it this way. I sponged on Seedless Preserves first and then added a tiny bit of Black Soot. I stamped the greeting using My Favorite Things Black Licorice Hybrid ink and adhered the circle onto the bag. Then I adhered the pumpkins with dimensional tape.


Using images from the stamp set, I random stamped the little candies using Versamark ink. That's a quick and easy way to turn flat card stock into something special, by giving it a nice tone on tone look.  I filled the goodie bags with treats and tied it closed with Spooky Hemp Twine, also from Lawn Fawn.

Cute, fun project that I know will be well received by the little goblins I plan on giving them to. :)

*I am entering this project into the ANYTHING GOES challenge at Simon Says Stamp.*


That's all I have for today. Thanks for stopping by, I appreciate the visit. Have a Happy and SAFE Halloween!

Blessings~


supplies~
stamp set: Spooktacular(Lawn Fawn)
card stock: Vibrant Violet(GinaK Designs)  Orange Zest(Papertrey Ink)  Basic Black(Stampin' Up!)  Neenah Solar White(Simon Says Stamp)
ink: Black Licorice Hybrid(My Favorite Things)  Seedless Preserves, Black Soot Distress Ink(Ranger)
dies: Classic Circle Nestabilities(Spellbinders)  Spooktacular dies(Lawn Fawn)
bling: Clear Wink of Stella glitter brush(Zig)
coloring medium: Spectrum Noir colored pencils ~ The Essentials set
other: Spooky Hemp Twine(Lawn Fawn)  Gamsol(Inky Antics)  blending stumps(Dick Blick)

Thursday, February 13, 2014

Lots of Valentines!

Hello Friends! Guess what? Yep, I have more Valentine's to share. Let's jump right in. Each year, I like to create a little something for my daughters for Valentine's Day. They are 22 and 17 now, but they still like to know that mom is thinking about them. I saw a really cute card on StampTV and I decided to take that layout and create a few cards. Take a look...


It's a pretty simple layout. I like that I could showcase the patterned paper and I used up some scraps.


The images are stamped onto my favorite white card stock and colored with Copic markers. I also added sparkle where I could using my Wink of Stella glitter brush. These were quick and easy to make. The hardest part was selecting the stamps and patterned papers.

I finished off the insides of both cards the same way, so I'll just show you one here.


I am absolutely in LOVE with that tiny heart from Lawn Fawn. I think I used it on every single Valentine's Day card I created this year. I only used one color of ink here too. I did some generation stamping...getting more bang for my buck!

Then, I remembered I needed a little gift-y for a friend and I thought, what the heck, let's roll with this layout, so I created this.


I'm also loving that Strawberry Slush color from Stampin' Up! It's so pretty in real life. 

On this one, I used a little technique I spied HERE on Jennifer McGuires blog. The punched hearts are stacked and I added a small heart to the centers. After I adhered them, I brushed clear Wink of Stella on them and let it dry for a moment. Then, I added Glossy Accents over top. And boy did that make them shiny and sparkly! Here's a close up...


You can also see that I added sparkle with a glitter pen, used my Wink of Stella on the frosting of the cupcake and glittered the little heart, too. This friend appreciates my sparkles or maybe not...she tells me I have far too much time on my hands! LoL! No matter...I don't let anyone dull my sparkle!! I like the way it turned out. Sooo...wanna see the inside? Okay!


Surprise! Guess what? YES! More sparkles!! Hahahahaha!! I don't know if these look silver or gold on your monitor, but they are neither. This was silver glimmer paper and using a sponge dauber and pink ink, I sponged on a little ink and the result is a soft, subtle pink shade that is so so pretty! Well, I didn't stop here. Remember, I said I needed a gift-y thing. Sooo...while visiting Angie Juda of Chic' n Scratch blog, I saw THIS sweet little box and I thought it was perfect.


If you've never been to Angie's blog, you should, you're missing out. She creates the cutest things with paper and most include a video tutorial and a PDF. All of her creations are super easy to make and of course they can be adapted to whatever papers or stamps you have in your stash. Ok. So, here is the set I am giving to my friend.


The patterned papers are the same. On my monitor, I'm getting two different colors, but I assure you they are the same. I whipped up a few more of these boxes to give treats to my daughters. It really holds a lot. But, since it is just paper, I didn't overload it. There are four mini York Peppermint Patties in there. Had I used card stock or a heavier weight of paper, I could have added more.

Whew! That is it for me today. I have had a blast creating all of these Valentine's Day cards. I hope you have enjoyed seeing them.

Have a wonderful Thursday!


Blessings~


supplies~
stamps: Tiny Treats:Valentine's, Signature Greetings(Papertrey Ink)  be my valentine(Lockhart)  Happy Valentine's Day(Craftsmart)  I {Heart} Hearts(SU!)  tiny heart-Happy Harvest(Lawn Fawn)
card stock: Cryogen White(Inspiration Emporium)  Neenah Solar White(Simon Says Stamp)   Whisper White, Strawberry Slush, Cherry Cobbler(SU!)
patterned paper: Love Me Collection(My Mind's Eye)  2013-2015 In Color DSP paper stack(SU!)
specialty paper: Silver Glimmer paper(SU!)
ink: Cherry Cobbler, Strawberry Slush(SU!)  Memento Rich Cocoa, Tuxedo Black(Tsukineko)
punches: Heart to Heart, Full Heart(SU!)
dies: Scalloped Heart of Hearts(SU!)
bling: Clear Wink of Stella glitter brush(Zig)   Clear Stardust glitter pen(Sakura)  Tourmaline glitter(Martha Stewart Crafts)
other: Copic markers  Glossy Accents(Ranger)  white ribbon(Offray)  valentine treat bag(Wilton)

Thursday, November 7, 2013

Thursday Challenge @ MelJen's Designs!

 Hello Friends! This week our challenge is...

"Friends Forever"
 Create a project for a friend

Pretty easy, right? I chose to make a little gift for one of my tea loving friends. I decided to make a tea bag dispenser, featuring the Fancy Little Teapot .


click to enlarge

I had been wanting to make one of these for a while. And this week, there was a tutorial for making them in my Splitcoast Stampers newsletter! Plus, there was a video! I love it when there is a video. It was actually very easy to make. I sized my teapot to fit inside the circle die, to make sure it would fit nicely on the front. I colored  the image with Copic markers, die cut it and dusted it with distress ink. I also added plenty of glitter pen...


I just LOVE sparkle! It's my 'signature' add-on. The card stock I used has sparkles on it already and I just add a bit more with the glitter markers and pens. I colored the tiny gems and the pearls with a Copic marker. And I finished off the lid, with a rosette, adorned with a little tea cup charm...


The box itself is pretty sturdy. I used textured card stock, because that's all I have in 12 x 12. I like how it turned out and I would like to make a few more. I think Ghiradelli chocolates might fit in here, too!


I hope you take a moment to stop by the Design Team blog to see what the other members have created. It's always a treat! And then, play along with us. You just might win a few FREE digital stamps. Remember that in order to be included in the random drawing, you must you a MelJen's Designs image on your project.

And don't forget about the Holiday Sale going on at the Shop right now.  Every digital stamp is 50% off! No coupon code needed...just go SHOPPING!! Now is a GREAT time to grab those Christmas and Valentine's Day digis!


That's all from me today. Thank you so much for stopping in! I appreciate the visit.

Blessings~


supplies: 
digital stamp: Fancy Little Teapot(MelJen's Designs)
stamp set: Tea for Two(Papertrey Ink)
card stock: Cryogen Iridescent White   Autumn Terracotta Textured(Close to My Heart)  Very Vanilla(Stampin' Up!)
patterned paper:  FanFare(Stampin' Up!)  Texture(DCWV)
ink: Autumn Terracotta(Close to My Heart)  Rusty Hinge Distress Ink(Ranger)
dies: Classic Circle, Scallop Circle Nestabilities(Spellbinders)
ribbon: Merlot Grosgrain(GinaK Designs)
other: Tiny Twinkles(Taylored Expressions)  pearls(Stampin' Up!)  Teatime Trinkets(Stampin' Up!)  yellow, brown, clear Wink of Stella glitter markers(Zig)  Clear Stardust glitter pen(Sakura)  Copic markers

Sunday, April 28, 2013

Tea Time!

Hello Friends! Some of my friends and I went to Tea yesterday and I am sharing the table favors I made for everyone. This is the same base I've used HERE and HERE. But I wanted to show how dramatic it can look just by using richer colors.

click to enlarge
 The tiny specs you see are from my homemade shimmer spray. They are VERY sparkly! Just like I like it!


I've received several e-mails requesting measurements and  instructions for the tea bag holders. I have to first say that this is not my idea. I found the original post on Pinterest. The design is by Cheryl L.Owczarek, a fellow Stampin' Up! demonstrator.

Here are the basic instructions and measurements.

Card base:
Cut card stock 3."x11" and score at 3.5", 7" and 7.5" Using a bone folder, fold each score line toward the inside and burnish to create a crisp fold. Cut off the upper right corner on the longest side to create the triangular pocket. Adhere with strong adhesive. I use 1/8" Scor-Tape.

Layers:
card stock-A cut two pieces at 3.25"x3.25" one for the outside and one for the inside
card stock-B cut one piece at 3"x3" for the inside
card stock-C cut one piece at 2/78"x2.78" for the inside stamped focal
patterned paper- cut two at 3"x3" one for the outside and one cut in half diagonally for the inside pocket.

I think the assembly is pretty straight forward, just cut and adhere the layers. The outside focal image can be anything you want, design it to fit your specific occasion. I slipped a Tazo "Calm" tea bag, into the pocket. It has chamomile, rose petals and herbs...VERY good tea! And the color of the packaging worked beautifully with my tea bag holders.


Anyway...have fun with it! And if you make some, please leave a comment on this post, with a link to your project. I would love to see what you come up with!  If you have any more questions, feel free to e-mail me.            

That's all for me today! Thanks for dropping in!

Blessings~


materials~
stamp sets: Tea for Two, Everyday Blessings, Fancy Flourishes(Papertrey Ink)   'ink spots' from French Foilage( Stampin' Up!)   Adorable Backgrounds(Close to My Heart)
card stock: Blackbird(Bazzill)   Vintage Cream(Papertrey Ink)   Sweet Corn(GinaK Designs)   Cherry Cobbler(Stampin' Up!)
ink: Creme Brulee, Bamboo(Close to My Heart)   Soft Suede, Cherry Cobbler(Stampin' Up!)   Delicata Golden Glitz, Versamark(Tsukineko)
patterned paper: Old Curiosity Shoppe Collection(Graphic 45)
dies: Lacey Circles Nestabilities(Spellbinders)  Tea for Two(Papertrey Ink)
other:  Old Gold ribbon(Offray)   Tiny Twinkles(Taylored Expressions)  Calm Tea(Tazo)

Sunday, March 24, 2013

Missing Blog Post...

Hello Friends! I don't know why but...my blog post is not being picked up by the Readers. Scroll down or click HERE to see the post for today. It features these little paper pretties...


Thanks for stopping in!


Blessings~

Spring Tea Party Table Favors

Hello Friends! Today, I'm sharing the tea bag holders I was commissioned to create. I made THESE last year for my mom to give to her Bible study group. One of the members really liked them and asked if I could make some for a Spring tea party she was having. She wanted them to match/coordinate with her china pattern, which is the very recognizable, Old Country Roses by Royal Albert.


Well, finding the stamp set, card stock and inks was easy. Locating patterned paper that would work with the pattern without clashing, was not. I knew I was going to have to make my own, but I didn’t have any rose stamps that would work. So, I looked to the World Wide Web.  I found a site that sold paper goods that matched the pattern, but that was much too expensive for what I had to do. And then, I was browsing and came across THIS site and they had a rose motif that was perfect. I ended up making my own patterned paper with Photoshop and printing it on specialty paper. I just LOVE the way it turned out! 


I also ended up coloring my own seam binding…


What a mess! I have done this many times, but this time I added too many drops of re-inker and I had to fish the ribbon out of the bag before it got too dark! I like coloring my own ribbon, because I can buy neutral seam binding in bulk and make it whatever color I need.


I like how it turned out. It’s usually not such a messy endeavor. Next time I need to pay closer attention to what I’m doing.

Once I had all the components gathered, I was finally able to sit down and make these...


click to enlarge


These table favors are easy to make. I put them together assembly line style, and they came together fairly quickly. Creating the concept and prototype were the most time-consuming parts of the project.  Each holder received a blast of shimmer spray and three bitty pearls. And there you can see a close up of the hand dyed ribbon, too.


I slipped a rose petal infused teabag into each pocket and tied on a seam binding bow and the holders were finished. I really like the color combo and I was so pleased to be able to pull everything together to complete the project. My mom's friend was very happy with them and she would like for me to make some for a Mother's Day tea party she has planned. Ummmm...


That's it for me! Thanks for stopping by!

*I am entering this into the Easter/Spring Challenge at Simon Says Stamp*

Blessings~


materials~ 
stamp sets: Tea for Two, Everyday Blessings, Fancy Flourishes(Papertrey Ink)  "water spots" from French Foliage(Stampin' Up!)
card stock: Raspberry Ripple, Primrose Petals, Daffodil Delight, Whisper White(Stampin' Up!)  Fresh Asparagus(GinaK Designs)
patterned paper: Ramblin' Roses(Blessed Designs by B.)
specialty paper: Premium Presentation Paper MATTE(Epson)
ink: Raspberry Ripple, Primrose Petals, Daffodil Delight, Old Olive(Stampin' Up!)  Bamboo(Close to My Heart)
dies: Tea for Two(Papertrey Ink)  Lacy Circles Nestabilities(Spellbinders)
other: pearls(Stampin' Up!)  hand dyed seam binding, gold shimmer spray(Blessed Designs by B.)