Showing posts with label Thank You Cards. Show all posts

Friday, October 23, 2020

Power Poppy ~ Mossy Pots with Paperwhites

Hello, Friends! This is the day we've been planning for the last several weeks! It is finally time for the reveal and release of the newest Power Poppy clear stamps and digis for The Holidays 2020...This is the kickoff of our Quiet Christmas Collection and it's Quite a Christmas release! So big in fact, that we are breaking it up into two collections! Get ready for ten days of glorious inspiration from the NEW Bloom Brigade.  We have been coloring and creating in anticipation of sharing these beautiful new designs with all of you! Are you ready? Let's get to it!


Today we are showcasing, Mossy Pots with Paperwhites


Lovely, isn't it?! I can practically smell the paperwhites! Marcella is a master at illustrating florals! One of the things I like most about this set is the versatility. It can be used for Christmas, thank you and on into the new year. Today, I am sharing the thank you card I created. 


I printed my image and sentiment onto a piece of Springhill Digital paper and colored it with Caran D'Ache Luminance and Prismacolor colored pencils. I dusted a little Speckled Egg Distress Ink around the edges of the main image and the sentiment label. I used the Simon Says Stamp Stitched Rectangle die to cut the focal point, the Friendship Jar Label die to cut the sentiment, gold peel off stickers from Love from Lizi, patterned paper is Mistletoe from Memorybox and the sparkly gems are from Pretty Pink Posh. My card base is 100lb Recollections white from Michael's and I used Toffee card stock from Taylored Expressions for matting. So, what do you think about this set?

That's all I have to share with you today. Please take a moment to visit the Power Poppy blog to see all of the lovely artwork The Bloom Brigade has created to inspire you. I'll see you back here tomorrow to introduce you to another gorgeous stamp set. We're trying something different and we're posting in the afternoon, so my posts will be up at 3:00pm Pacific. 

Thank you for visiting! I appreciate it!

Blessings~


Friday, July 20, 2018

5 Days of Power Poppy Digis?!

Hello, Friends! Happy Friday to ya! There's been something BIG brewing at Power Poppy and now I can finally share! Marcella has been oh so busy at her drawing table and now she is releasing FIVE BRAND NEW digis for us!


The theme of this release is kindness, love, peace, curiosity and meaning. Each of the images were created from Marcella's heart and they all have a special meaning to her. I'm so pleased that she's sharing a bit more of herself with us! I can tell you, you are in for a real treat! The images in this release are simply lovely.

We're getting this party started today with a fabulous FREEBIE called, Kindness is the Way.  This digi features an allover pattern of Gerbera Daisies in black and no-line versions. Then you also get two versions of the background with the phrase "Kindness is the Way" superimposed, using lettering that you can color in. Also included is a single Gerbera Daisy in case you want to just keep things simple. This gorgeous floral digi is sized to cover an entire card front!

One of the fun things I love about creating with digital stamps is the versatility. The images can be resized to work with any project I can dream of. For my card share today, I chose to shrink this image to about 3x4inches. It still packs a punch, just in a slightly small size. Take a look...


I printed the image onto smooth white card stock. Then I colored the back ground with a Copic marker. That felt so good, I decided to color the flowers in with Copic markers, too! Then I went back and added a few touches with colored pencils. I printed a second image, fussy cut around the "Kindness is the Way"greeting, then I highlighted the letters with a Copic marker and a Sakura Stardust pen. Next, I mounted it onto the focal panel with foam adhesive. And, although the picture doesn't show it, this card is super sparkly! Each of the flowers has been kissed by a Spectrum Noir Sparkle pen. I added a few iridescent sequins topped with tiny gems as a finishing touch. I just wanted this card to be riot of color and sparkle. I want the recipient to feel loved, appreciated and happy when the envelope is opened.

So that's it for me today. Please visit the Power Poppy blog to see what the other designers have to share with you. You will not be disappointed! Then check back with me tomorrow. I'll introduce you to another new digi and I'll have a card to share.

Have a great day and thanks for stopping by!

Blessings~

Tuesday, June 19, 2018

Day 19 of The Daily Marker 30 Day Coloring Challenge

Hello, Friends! Welcome to day 19 of The Daily Marker Coloring Challenge! Are you coloring along with us? Are you sharing your artwork on social media using #thedailymarker30day? Have you seen all of the fresh, re-mixed digi sets that were recently released for the DIGITAL BLITZ at Power Poppy?!


Well, today, I am sharing a clean and simple card featuring another one of the sets from the Blitz. This one is called, Perfect Poppies.

I printed this image onto smooth white card stock and colored it with Prismacolor colored pencils AND I used gamsol to blend it out. (gasp!) I know! I know! I don't usually use solvents. I decided to try something different. I liked it! Will I use it again? I dunno. Maybe. I gave the poppy a bit of sparkle with my clear Wink of Stella glitter brush.


That's it for me today. Thanks for stopping by! Have a terrific Tuesday!

Blessings~

Sunday, March 5, 2017

Power Poppy ~ Flower Bomb AND The Daily Marker 30 Day Coloring Challenge

Hello, Friends! Happy Sunday! I hope your weekend is going great! Today is March 5th and that means it's time for a new "Digi on the 5's" from Power Poppy. Marcella has REALLY outdone herself with this one. It's HUGE and full of roses and violets, it's a colorists dream. Take a look at Flower Bomb.


BOOM! Gorgeous, right?! It's a fragrant explosion of roses and violets that will produce a most pleasurable coloring experience. Whether you show off the entire bouquet, or zero in on just one area of ruffled rose petals and wild violets, this image packs plenty of punch. It's just loaded with buds and blooms! I am a rose lover so this one was calling my name! I had a few ideas on how I wanted to use it. I will have another card to share later in the week but for today, I decided to use Copic markers and colored pencils.


I printed the image onto a die cut piece of Papertrey Ink Rustic Cream card stock. Then I turned on some music and got busy. Did I mention that this image is HUGE?! I decided to keep the coloring really simple, just doing a little shading here and there. And, speaking of coloring...This card serves as my submission for Day 5 of the 30 Day Coloring Challenge! Are you coloring along with Kathy and friends? Baaaack to the card... I went over all of the flowers with a clear Wink of Stella glitter brush. It's soooo sparkly. The greeting I used on the outside of the card is from another Power Poppy digi set called, Spring Meadow Bouquet. I printed that onto vellum and while the ink was still wet, I sprinkled on some Ranger Liquid Platinum embossing powder and heat set it. I finished off the focal panel with a few Pretty Pink Posh Sparkling Clear sequins.

I used the sentiment that is included in the set, for the inside of the card.


I printed the floral image again in a pale gray so a personal message could be written over top. Easy peasy but has great impact. This is one of the things I really love about digital stamps. They can be re-sized to suit my needs. Soooo versatile. And, speaking of digital stamps...remember that ALL Power Poppy digital stamp sets are 25% off for the month of March! Now is the time to pull out your wish list and add some new digis to your collection. And look HERE for an AMAZING Power Poppy Giveaway...The entire March clear stamp release is up for grabs!

So that's it for me today. Please visit the Power Poppy blog to see what my teammies have created to share with you. Thanks for stopping by!

Blessings~

Thursday, September 15, 2016

Power Poppy ~ Black-Eyed Susan

Hello Friends! Today is the 15th and that means that there is a new digi stamp set waiting for you in the Power Poppy shop. It's called Black-Eyed Susan and it features a cluster of Black-Eyed Susans and a few sweet sentiments.


I decided to pull out my Gansai Tambi watercolors for this one. I kept the watercoloring loose and care-free and I used the faux watercoloring technique. I wanted it to look like I painted the flowers free hand, rather than following an outline of a printed image. I may need a little more practice with this. ~ smiles


 Here's a close-up view for you...


I printed the image and sentiment onto a die cut piece of  watercolor paper. I re-colored the image to be a washed out grey, so that the lines would disappear when I painted them. After the focal panel was dry, I matted it with a dark brown card stock and adhered it to my card base with foam tape. To give it more of an Autumn feeling, I added a raffia bow onto the wooden clothespin and clasped that onto a few little paper banners. The finishing touch was a sprinkling of Pretty Pink Posh sequins. And that was all there was to it!

But wait! There's more...
  
As we help kick off Power Poppy’s brand new release Black-Eyed Susan, we have some other fun to share! A selection of our favorite digital designs are available at a special price! These late summer flowers and fruits are in full bloom — ready for you to download, print, and color to your heart’s content! Power Poppy’s brand new Black-Eyed Susan, plus Pure Prairie Bouquet, Sunshine of My Life, Cuppa Buttercups, and Apples in Season are just $4 each (save $2 per set) OR, get all five digital stamp sets in a bundle for $15 (a total of $14 savings). What’s even better? Play along in our weekend Coloring Contest over at Passionate Paper Creations and Friends using one of these five stamp sets and you could win a $20 gift code to the Power Poppy Shop! Contest and sale closes Monday, September 19th at midnight. A winner will be announced sometime on Wednesday, September 21th  on the PPCF Facebook page.
 
Here are the cards I created featuring the sets that are on sale. I have also provided links to the Power Poppy shop for each set.

Pure Prairie Bouquet


Sunshine of My Life


Cuppa Buttercups


Apples in Season


Thank you so much for stopping by! Please make time to visit the Power Poppy blog to see what my Teammies have created to share with you. Prepare to have your socks knocked off!


Blessings~


supplies~ 
digital stamp set: Black-Eyed Susan(Power Poppy)
card stock: Dark Chocolate(Papertrey Ink)   Desert Storm(Neenah)
patterned paper:  12 x 12 Spring pack(Brenda Walton)  Text(Stampin' Up!)
specialty paper: Canson XL 140lb watercolor paper
dies: Stitched Rectangle(Simon Says Stamp)  Journaling Tag(Lawn Fawn) Bitty Bannners Framelits(Stampin' Up!)
bling: 4mm Mossy Green, Marigold, Espresso sequins, 6mm Sand sequin(Pretty Pink Posh)
other: wooden clothespin(Stampin' Up!)  raffia(Michael's)

Monday, July 25, 2016

Power Poppy ~ Forget-Me-Not Heart and Day 21 of The Daily Marker 30 Day Coloring Challenge

Hello Friends! Happy Monday to ya! Today is Day 21 of The Daily Marker 30 Day Coloring Challenge. Are you playing along? How's Summer treating you? It's been hot as hades here and I just tend to melt away during the summer months. I don't get much creating done and I'm good with that. I just try to stay hydrated and cool. Speaking of cool...I've got a pretty cool re-mixed digi to share with you today. It's a heart made from a strand of Forget-Me-Nots from one of Marcella's new clear stamp sets, Soothing Sympathy. This sweet digi is called Forget-Me-Not Heart and it includes two sentiments and two hearts...one with and one without the Thank You.


Isn't it sweet?! I love the delicate forget-me-nots. And they are so pretty fashioned into a heart. The sentiments are perfect with the image and I love the handwritten font. I decided to make a square card and pair the image with a little gingham...please click on the images to enlarge them.


I printed the image onto smooth white card stock and colored it with Copic markers. I added a bit of clear Spectrum Sparkle to each of the blooms and finished the card off with a little white twine and a few sequins. The die cut focal panel is mounted with dimensional adhesive. Coloring this sweet image was quick and easy. I also finished off the inside.

I used the other sentiment included in the set and I re-colored and re-sized the heart and printed it right along with the greeting. I had so much fun working with this set, that I decided to create a few more cards...

I just had to make a pink card. It's my favorite color and I adore this gingham paper. Isn't this card just the sweetest thing? I printed this image onto smooth Bristol and I watercolored it using  a combination of Spectrum Sparkle pens and Zig Clean Color Real Brush markers. To finish my card, I scattered a few pearls about and added a little white twine bow.

And I created one in Olive, too....

I was on a roll. I had Journey playing in the background and I got in a zone and just went for it! This one is watercolored on smooth Bristol just like the pink one. I made two of each color. Here's a peek at the inside of the card...


I realize that I needed to tuck those hearts deeper into the corners and I did on the other one that I made. But, again, I re-colored and re-sized the heart image to suit my needs. That's what is so fun about digital stamps. They are so versatile.

Well, that wraps up what I have to share with you today. Please visit the Power Poppy blog to see what awesome gorgeousness my Teammies have created for you.

Thank you for stopping by! Have a marvelous Monday!


Blessings~


supplies~
digital stamp set: Forget-Me-Not Heart(Power Poppy)
card stock:  Neenah 80lb white  Olive, Hollyhock, Star Spangled Blue(Close to My Heart)
specialty paper: Bristol 100lb card stock(Strathmore)
patterned paper: Olive, Hollyhock, Star Spangled Blue gingham(Close to My Heart)
dies: Stitched Square(Simon Says Stamp)
bling: rhinestones, pearls(Stampin' Up!)  4mm Sparkling Clear sequin(Pretty Pink Posh) 2mm silver sequins(Simon Says Stamp)
coloring media: Copic markers   Clean Color Real Brush pens(Kuretake-Zig)  Sparkle markers(Spectrum Noir)
other: white baker's twine(Stampin' Up!)

Friday, April 29, 2016

From The Heart Stamps Monthly Challenge

Hello Friends! I barely made it in time, but here I am! Each month that I participate in the Monthly Challenge with From the Heart Stamps, I am gifted one FREE digital stamp set. The challenge is fun and easy and anyone can join in. You can read about the challenge HERE.

This month, Faith has given us another beautiful set. This one is called Time to Bloom and it's loaded with lots of good stuff. Take a look...


Pretty, isn't it?! And versatile, too. Well, I chose to use the butterfly/moth and the small flower cluster and I decided to make a few thank you cards with the "Many Thanks" sentiment. Please click on the pictures to enlarge them.


This was really quick and easy to do. I set everything up in a Word document and then printed it. I used a stitched rectangle die to cut them out and colored them with Copic markers. I kept the card design clean and simple, so I could make multiples quickly. After I finished the coloring, I added Clear Wink of Stella to the wings.


For the inside of the card, I used the small flower cluster and colored them with the same colors as the butterflies. Sweet and simple.


I matted the focals with black card stock and then adhered them with dimensional adhesive. A sprinkling of Pretty Pink Posh sequins added the finishing touch!


That's all I have to share with you today. Thank you for stopping by. I appreciate the visit. Have a wonderful weekend!

Blessings~


supplies~
digital stamp set: Time to Bloom(From the Heart Stamps)
card stock: Neenah 80lb, 110lb  Basic Black(Stampin' Up!)
patterned paper: Chalkboard 6x6 paper pad(WeRMemoryKeepers)   Green Leaves Collection(Papertrey Ink)  
dies: Stitched Rectangle(Simon Says Stamp)
bling: 4mm Sparkling Clear, Pink Peonies, Mossy Green sequins, 6mm Tangerine, Pink Blush sequins(Pretty Pink Posh)   Clear Wink of Stella glitter brush(Zig)

coloring medium: Copic markers

Sunday, February 7, 2016

The Daily Marker 30 Day Coloring Challenge - Day Seven

Hello Friends and Happy Sunday! Today's coloring share doesn't actually have coloring. But, it does have color and that's good enough for me! Haha! Today was a very full day and honestly, I was just too pooped to party and I did not want to color. So, I'm sharing the cards that I am working on for a customer. I am making 15 of these and I really need to get them completed, so that's what I did today.


They are really simple Thank You cards and that is what she wanted. Lots of stamping, a little embossing on vellum, a smattering of sequins, a stitched rectangle and a few rounded corners are what make up this trio of cards.

That is all I have for you today. Thanks for visiting!


Blessings~


supplies~
** I always include a listing of the supplies I use on my cards. But, I can't today. So, if you have any questions about a specific product or item, please email me, using info in the CONTACT tab at the top of my blog. Thank you.**

Wednesday, November 4, 2015

30 Day Coloring Challenge 3 - Day 30!

Hello Friends! Well, we made it to Day 30! Whoooo Hoooo!  I am officially caught up! You're getting two posts today, because I am going to be super-de-dooper-busy for the next few days.

Because I am so very appreciative to Kathy Racoosin for hosting the 30 Day Coloring challenge and I'm also very thankful for all of you, who traveled with me on this 30 day coloring journey, I thought it fitting to create a Thank You card.


AND...I am submitting this card into the DT call at Stamping Smiles Designs. They have issued a tic-tac-toe challenge. Here's the board:


I chose the middle row: Leaves. Embossing. Sparkles. I started my project by die cutting some Stitched Leaves using a Lawn Fawn die set. I also selected my Distress Inks.


Then, I got inky! Using the daubers made this part quick, fun and easy.


I set them aside to dry and worked on my focal panel and card base. For the focal panel, I random stamped more leaves and a bit of text onto a piece of vanilla card stock. Then I inked the edges. I created a standard A2 top folding card base with Kraft, and I inked those edges, as well. Then, I adhered several of the inked leaves onto the stamped vanilla piece and embossed it with a textured embossing folder. I really like the look of that. It makes people go, "How'd she do that?" Next, I adhered the focal panel onto my card base, using foam tape. I embossed a greeting onto an inked piece of Kraft and glued that to the focal panel, then finished it off with one of the inked leaves. My finishing touches included, going over each leaf with a Clear Wink of Stella glitter brush and adding a sprinkling of Pretty Pink Posh sequins.


And that is that! As usual, I really enjoyed the coloring challenge. I learn something new each time I participate and I always come away with new crafty friends. I'm already looking forward to the next one! Thank you again Kathy for hosting, you're the best!

Blessings~


supplies~ 
stamp set: Curly Cute, French Foliage(Stampin' Up!) 
card stock: Very Vanilla(Stampin' Up!)   Neenah Desert Storm(Kraft)
ink: Scattered Straw, Peeled Paint, Spiced Marmalade, Rusty Hinge, Wild Honey, Antique Linen, Vintage Photo Distress Ink(Ranger)  Versamark(Tsukineko)
dies: Stitched Leaves(Lawn Fawn)
bling: 4mm Pumpkin, Mossy Green, Marigold, 6mm gold sequins(Pretty Pink Posh)  Clear Wink of Stella glitter brush(Zig)
other: Square Lattice embossing folder(Stampin' Up!)  Early Espresso embossing powder(Stampin' Up!)


Friday, July 10, 2015

Thumbs Up, Kathy!

Hello Friends! My card share today is part of another card drive of sorts. There is a group of us card making gals on Instagram that are collaborating to create cards in support of Kathy Racoosin, the host of the super fun 30 Day Coloring Challenges. Recently, there have been some unkind people visiting Kathy's YouTube channel and we wanted to show her that we appreciate what she's doing!

If you've been following along with my blog, then you'll know that I have BIG love for Kathy. She not only coordinates the 30 Day Challenges but, she also creates a project and usually a video for us each day of the challenge. She shares her tips and techniques and gets us inspired to color something for the day. In addition to that, she takes the time to comment on all of our posts, either on our blog or on Instagram. Can you imagine how much time that takes?! This is no small thing, these 30 Day Coloring Challenges. Google it and you'll see. All levels of colorists participate, from beginners to coloring masters, including recognizable names, such as Jennifer McGuire, Sandy Allnock and Kristina Werner, to name a few. I've made a lot friendships through these challenges and I have been inspired by some wonderful people and it's all because of Kathy's genius idea; To get us all to take a moment out of our busy day, to spend five minutes doing something for ourselves that makes us happy and brings us joy. And Kathy does all of this out of the kindness of her heart for FREE.

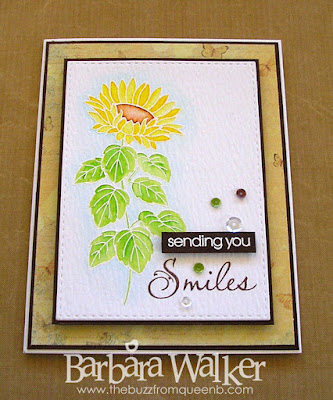
I decided to do a little watercoloring. Kathy shared a lot of watercolor techniques during this last 30 Day Challenge. One day she watercolored some sweet sunflowers and you can see that beautiful creation HERE. She also used Zig Clean Color Real Brush pens. Sooo...taking inspiration from Kathy, I created this card...

click to enlarge
I started with a stitched rectangle die cut panel of Tim Holtz Distress Watercolor Card stock. I stamped the sunflower with Versamark ink and embossed it with fine detail white embossing powder. And as usual, I worked on the textured side. I especially like the texture with the sunflower. Then I watercolored it with my Ziggies. After the panel was dry, I used my MISTI  to stamp the "Smiles" and the inside sentiment which says, "Girly, You Rock!"


Then, I matted it with Dark Chocolate card stock and adhered it to my card base with a piece of craft foam. I went over the sunflower with a Clear Wink of Stella glitter brush to add a bit of sparkle. Then, I added a sentiment strip, also white embossed on Dark Chocolate card stock. I finished off the card with a sprinkling of Pretty Pink Posh sequins.


I don't know if Kathy will see this post or not, but...Kathy, keep being you and keep doing what you do! You get a "Thumbs Up!" from me!

And that is it for me today. Thank you for stopping by. I appreciate the visit. Have a wonderful weekend!

Blessings~


supplies~ 
stamps: Sunshine and Smiles(Clearly Besotted)  Signature Greetings(Papertrey Ink)
card stock: 110# Neenah Solar White for the card base.  Dark Chocolate(Papertrey Ink)
specialty paper: Tim Holtz Distress Watercolor Card stock(Ranger)
patterned paper: Sun Kiss Collection(Prima)
ink: Versamark, Memento Rich Cocoa(Tsukineko)  
dies: Stitched Rectangle(Simon Says Stamp) 
bling: 4mm Espresso, Mossy Green, Sparkling Clear sequins  6mm Sparkling Clear sequins(Pretty Pink Posh)  Clear Wink of Stella glitter brush(Zig)
coloring medium: #050-Yellow, #070 Orange, #041 Light Green, #060 Brown Zig Clean Color Real Brush pens(Kuretake)
other: Fine Detail White embossing powder(Simon Says Stamp)  MISTI(My Sweet Petunia)