Showing posts with label Cards for Kids. Show all posts

Wednesday, June 16, 2021

Sharing a Sheet Load of Cards!

Hello, Friends! It's been a while since I posted here, my goodness! My last post was in April. Anywho...I thought I'd pop in today to share what I've been up to. Earlier this year I posted about Playing With Paper  well, I'm at it again! I had to take a break from coloring and posting for a bit because I was dealing with eye strain and carpel tunnel in both wrists. But, being a Creative, I needed to find another way to make the cards I love to create. THIS is where Sheet Load of Cards from Crafty Al comes in. I became a fan of Alicia years ago when she had her Sheet Load, e-zine. Loooooong time ago. Recently, I discovered her on YouTube and fell in love all over again. Her sketches are fun, easy to follow, they require little to no coloring, they allow me to use up my patterned paper AND they yield a lot of cards! It's also a super quick and easy way to build up a card stash. Alicia releases a new card sketch on the first of the month and the sketches are FREE for her YouTube subscribers. Then on the second day of the month, Alicia shares a process video where she shows how she used the sketch to create a Sheet Load of cards. So much fun! Let me show you what I've created so far. I'll start with the most recent and then work backwards.


I created these cards using the June 2021 Sheet Load sketch. Yield 8 cards!

Cute layout, right?! The patterned papers are from the Flower Garden Collection by Carta Bella that came in my Club Echo Park kit. The stamp set from Lawn Fawn is called, Magic Messages and I die cut the circle using the coordinating die set. The scalloped circle die is from Spellbinders and the scalloped rectangle die is from Honey Bee Stamps. The sentiment is embossed with WOW Clear Sparkle embossing powder.

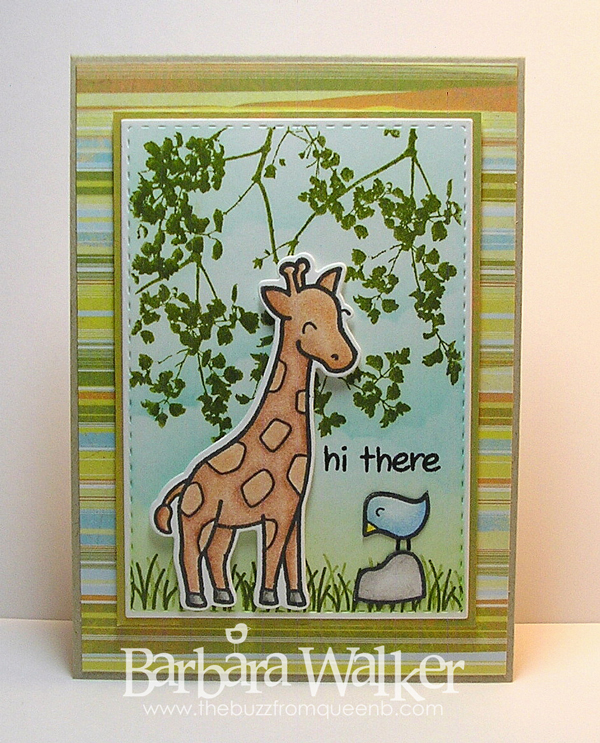
Next up are cards I created with the May 2021 Sheet Load sketch. Yield 6 cards. 

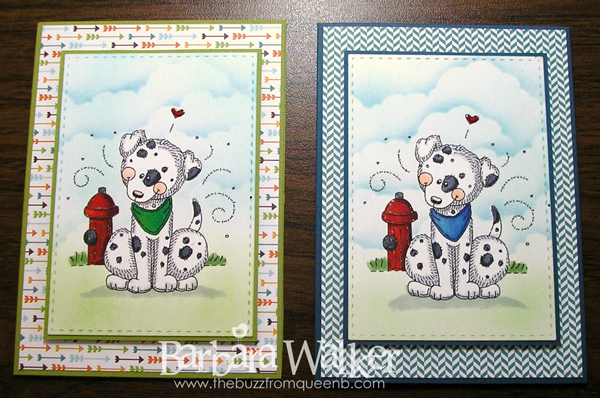
Because these cards were being made for donation, I created two sets, one for girls and one for boys.


It was love at first sight when I saw the Let's Be Mermaids collection from Echo Park. It has lots of patterned papers with coordinating stickers and that made this card creating session a breeze! The sentiment is from the  Beautiful Mermaid stamp set from Simon Says Stamp. The sentiment has a gorgeous blue sparkle from Mermaid Ultra Fine embossing powder, also from Simon Says Stamp.
 

Here is the set I created for the Birthday Boy...

I just love these little dudes! Patterned paper and stickers are from the Party Time collection from Doodlebug. The sentiment is stamped in black and embossed with clear embossing powder and it's from the Balloon Bouquet Additions from Taylored Expressions. Side note: Shop at Taylored Expressions using this link, HERE and get $5 shop with!

Here are the cards I created with the April 2021 Sheet Load sketch. Yield 10 cards!!😲


This sketch had us create mini slim line cards! I'll be honest, I'm not a fan of the slim line cards. But I think the mini slims are adorable! The patterned papers are from the Carta Bella Flower Garden collection, the sentiment is from the Just Miss You stamp set from Simon Says Stamp and it's stamped in Fallen Leaves VersaFine CLAIR ink and embossed with clear embossing powder.  If you look closely, you can see a bit of sparkle on the sides of the vertical panels. Those are peel offs from Love from Lizi!  I also added some clear glitter dots from Elizabeth Crafts. Such subtle sparkle, such big impact.


Soooo that's a little peek into what I've been creating. I plan to keep on with these and I'll post as I go along. Let me know if you try out any of the Sheet Load sketches. There are many and they are all available for FREE when you subscribe to the Crafty Al YouTube channel

Thank you for stopping by I appreciate the visit.

Blessings~


Saturday, November 21, 2015

Share Handmade Kindness - Cards for Kids

Hello Friends! Happy Saturday! Short post today, as I've got a mountain of things I need to tackle. This week the focus for the Share Handmade Kindness Challenge is creating cards for kids. When I saw that I thought about MelJen's Designs and I knew exactly which image I wanted to use. 

I also decided to use sketch #213 from Freshly Made Sketches. I haven't used a sketch in a while and when I saw this one on Facebook, I thought it would be perfect with the image I had in mind.


I've used this digi several times but, he's so darn cute, I couldn't resist using him again. I know you all remember the MelJen's Designs Circus Clown...


I printed this little guy onto a die cut piece of smooth white card stock and colored him with Copic markers. I placed the panel back into the die and then dusted on blue ink. Next, using my MISTI I added the greeting. Then, I accented some of the lines with a glitter pen, I added clear Wink of Stella to his nose, Sparkly Fluff to the puff on his hat and Crystal Effects to his nose and shoes.


I mounted him onto a piece of craft foam and adhered it to my card base and that was that!


Thank you for visiting me today. I appreciate it! I hope you are having a wonderful weekend!

Blessings~


supplies~ 
digital image: Circus Clown(MelJen's Designs)
stamp set: Birthday Basics(Papertrey Ink)
card stock: 80# Neenah Solar White
patterned paper: Sunkiss 6x6 paper pad(Doodlebug Designs)
ink: Tumbled Glass Distress(Ranger)
dies: Stitched Rectangle(Simon Says Stamp)
bling: 6mm Tangerine sequins, gold stars(Pretty Pink Posh)  Clear Wink of Stella glitter brush(Kuretake-Zig-USA)  Clear Stardust Gelly Roll pen(Sakura)
other: Crystal Effects(Stampin' Up!)  Sparkly Fluff(Our Craft Lounge)  MISTI(Pink Petunia)

Friday, September 25, 2015

Cards for Kids - You're So Cool

Hello Friends! Happy Friday! I've got another fun card share for you today. I used a stamp set from Simon Says Stamp called, Ice Cream Dream. Take a look...

This was a quick and easy card to make. I stamped the popsicles onto watercolor card stock and embossed them with white embossing powder. Then, I watercolored them with my Ziggies. I let them air dry and then I fussy cut them out. I adhered them onto the card base with foam tape. I added a little Crystal Effects to each popsicle. I stamped on a greeting and my card was done.

I made a total of 15 cards for my client. I had a blast doing it and I will definitely be creating more cards for kids along the way. 

Thank you so much for stopping by today.

Blessings~


supplies~ 
stamp set: Ice Cream Dream(Simon Says Stamp)
card stock: 80# Recollections card stock(Michael's)
patterned paper: Sunkissed 6x6 paper pad(Doodlebug)
specialty paper: Tim Holtz Distress Watercolor Card stock(Ranger)
ink: Coastal Cabana(Stampin' Up!)
coloring medium: Zig Clear Color Real Brush pens: #050 Yellow, #070 Orange, #041 Light Green, #031 Cobalt Blue, #022 Carmine Red, #060 Brown(Kuretake-Zig)
other: Crystal Effects(Stampin' Up!)

Thursday, September 24, 2015

Cards for Kids - Critters on the Savanna

Hello Friends! I am back with another card share in my Cards for Kids series. I am featuring another set from Lawn Fawn. This time, it's Critters on the Savanna.

Another super cute set! I fell in love with the animals on this one. They reminded of the days when I would visit the Wild Animal Park with my dad. I still remember the day I heard a lion roar. Scared the stuffins outta me! I love the big cats! Took a little detour there. LoL! I must be tired. Back to the card now...

click to enlarge
I stamped my images onto smooth white card stock and colored them with Spectrum Noir colored pencils. I didn't use any blending solution. I find that with the Spectrum Noirs I don't always need it. The color is so smooth, I can blend them with other pencils. I really like that! I can color with them anywhere. The set does have coordinating dies but, not for the all of the images which is sort of a bummer. I die cut the giraffe and fussy cut the bird and the rock. I created a background panel for my critters by sponging on blue and green ink and stamping on the leaves and grass. The giraffe is adhered with dimensional adhesive.

And that is it for my card share today. Thank you so much for dropping in!

Blessings~


supplies~ 
stamps: Critters on the Savanna(Lawn Fawn) Birch Branch Print(Memory Box)
card stock: 80# Neenah Solar White, 80# Neenah Desert Storm  Summer Starfruit(Stampin' Up!)
patterned paper: Cupcake 6x6 paper pad(Basic Grey)
ink: Black Licorice Hybrid(My Favorite Things)  Broken China, Shabby Shutter Distress(Ranger) Old Olive(Stampin' Up!)
dies: Stitched Rectangle(Simon Says Stamp)
other: Essentials, Nature colored pencil sets(Spectrum Noir)


Tuesday, September 22, 2015

Cards for Kids - Darling Dalmatians

Hello Friends! I am so pleased that you all are enjoying the Cards for Kids! I see a lot of views in my stats! If you stop by, please say hello!

Today cards feature more cuteness from MelJen's Designs. I used the Darling Dalmatian digi.


I love this image so much, I decided to create two. I printed my images onto smooth white card stock and die cut them with a Simon Says Stamp Stitched Rectangle die. I really, really love these dies! I reach for them all the time and I know I need to move on, but I can't yet. LoL! Please bear with me. Anyway, I colored the images with Copic markers. I also created a mask for them so I could sponge on  some clouds. To finish the cards, I added a few touches of clear Stardust pen to the hydrant and Crystal Effects to the little heart and his nose. The focal images are mounted onto the card base with dimensional adhesive.

On my monitor, my photos are blurry! I apologize if they are on yours, as well. I have no idea why. When I look at them in my picture folder, they are crystal clear. Ack!


Thanks for visiting today. I appreciate it. I hope your Tuesday is terrific!

Blessings~


supplies~ 
digital stamp: Darling Dalmatian(MelJen's Designs)
card stock: 80# Neenah Solar White(Simon Says Stamp)  Old Olive, Not Quite Navy(Stampin' Up!)
patterned paper: Into the Woods 6x6 patterned paper pack(Lawn Fawn)
ink: Broken China, Mowed Lawn Distress Inks(Ranger)
dies: Stitched Rectangle(Simon Says Stamp)
coloring medium: Copic makers
other: Clear Stardust Gelly Roll pen(Sakura)  Crystal Effects(Stampin' Up!)

Monday, September 21, 2015

Cards for Kids - Circus Clown

Hello Friends! I'm back again to day with yet another card in my Cards for Kids series. This time I reached for an old friend...MelJen's Designs. I just love her images and I knew this Circus Clown would be perfect.


I printed this little guy onto smooth white card stock and die cut him with a circle Nestabilities die. I brushed on a little blue ink to liven up the back ground a bit and then I colored him with Copic markers. Again, the client wanted simple cards, so I decided not to add any embellishments to this one. BUT...I was very free with the gloss and glitter! Click on the image to see things a little closer. I added Sparkly Fluff to the puff on the top of his hat, I put clear Wink of Stella on his nose and then coated that with Crystal Effects. And after I outlined the image with a clear Stardust pen, I added more Crystal Effects to his shoes. I had a ball with this card! LoL! I printed out a few more of this image and I plan to color him up again so I can put a few of these into my Card Boutique. I think it's just so much fun! I adhered the focal onto my card base with dimensional adhesive and called it done. I really wanted to add a sentiment or some ribbon or something, but...she said simple. And that's all I'm gonna say about that.

Thank you for joining me today. I appreciate the visit. Have a magnificent
Monday!
Blessings~


supplies~ 
digital image: Circus Clown(MelJen's Designs)
card stock: 80# and 110# white Recollections(Michael's)
patterned paper: Sunkiss 6x6 paper pad(Doodlebug Designs)
ink: Broken China Distress(Ranger)
dies: Standard Circle Nestabilities(Spellbinders)
bling: Clear Wink of Stella glitter brush(Kuretake-Zig-USA)  Clear Stardust Gelly Roll pen(Sakura)
other: Crystal Effects(Stampin' Up!)  Sparkly Fluff(Our Craft Lounge)

Sunday, September 20, 2015

Cards for Kids - Into the Woods

Hello Friends! I am back with another card share from my Cards for Kids series. Let me just say here that many of the cards I created can be given to any one, not just kids, but for this particular client, I created them for children.

I used Lawn Fawn again. As I have said in previous posts, I've collected Lawn Fawn stamps for some time now and I just don't use them to their fullest potential. In this series, I am going to try and remedy that. We'll see how it goes! LoL! Today's card features the Into the Woods stamp set. I love this set because it has a fall theme. I purchased it because I thought the little fox was sooo adorable and I could not stop thinking about that sweet smiling acorn. The set does have coordinating dies, but when I bought it way back when, it didn't, and I haven't purchased them yet, so I fussy cut my images. It's no biggie, as these are not very detailed images.


For my card, I created a scene for the little fox.


I started with a panel of card stock that I die cut with a Simon Says Stamp Stitched Rectangle die. I embossed the log with brown embossing powder, then I covered it with a mask. I also masked off two of the little clouds. Then, using an ink blending tool, I sponged on blue ink for sky and green for grass. I stamped my foxy friend onto smooth white card stock and colored him with Copic markers. I fussy cut him out and adhered him onto the focal panel with dimensional adhesive. I stamped the 'hello' onto white card stock, too and trimmed that out. I cut a few extras, so I could glue them all together to create a dimensional element that wasn't too bulky, but yet, wasn't flat. Using card stock and patterned paper, I matted and mounted the focal onto a Kraft card base.

And that's all there was to it! Another card finished...on to the next one!

Thank you for visiting with me today.

Blessings~


supplies~ 
stamp set: Into the Woods(Lawn Fawn)
card stock: Neenah Solar White 80#, Neenah Desert Storm(Simon Says Stamp)  Early Espresso(Stampin' Up!)
patterned paper: Into the Woods 6x6 petite paper pad(Lawn Fawn)
ink: Versamark(Tsukineko)  Black Licorice Hybird Ink(My Favorite Things)  Old Olive(Stampin' Up!)  Broken China, Mowed Lawn Distress Ink(Ranger)
dies: Stitched Rectangle(Simon Says Stamp) 
other: Early Espresso embossing powder(Stampin' Up!)

Friday, September 18, 2015

Elephant Hearts?!

Hello Friends! Not to worry, this isn't an icky post, Elephant Hearts is the name of the stamp set I used to create a few more cards in my Cards for Kids series. I've completed the series and the cards have all been mailed off to the client who ordered them. I told her that creating cards for kids was quite a challenge for me, because I don't do it very often. Another request from this client, was that the cards be simple and left blank on the inside. Whew! I tell you what, leaving them blank on the inside was fairly easy, but I had a dickens of a time keeping the exterior simple. Simple as in, not too much dimension, not too many layers and embellishments because the cards are intended for children, ages 0-10. I had to put on my creative thinking cap for this order!

So, you may have seen the first card I created for this client HERE. I also realized that I don't own many stamp sets that would work for kids and believe me, I have a few on order now! For today's card share, I am using one of the stamp sets that I received from the giveaway box from Jennifer McGuire. You can read about that in my previous post, HERE.

I decided to use a really cute stamp set from the Sweet Stamp Shop, called Elephant Hearts. It's a small set, but it's packed with tons of goodness; two images and 4 sentiments. Sweet.


I created two cards, both 4 bar sized for little hands. I used lots of Lawn Fawn on these, including the patterned papers and the focal panel die. When I saw this little elephant, I knew I had to use it on one of my cards for kids.


I kept the design simple, as per my client's request, but I did use a few techniques; paper piecing, and sponged clouds. On this card, I added a sentiment, which is also in the stamp set. I couldn't resist. I just love the saying and the font. The little grassy area under the elephant is from a Lawn Fawn stamp set, Critters on the Savanna. I added Crystal Effects to the balloons for a bit of shine and on the pink elephant card, the balloons also have a touch of clear Wink of Stella.


My client requested unisex cards and I respected that for the most part. However, I really needed to create a pink polka dotted elephant card! It was welling up inside me and I had to let it out. Originally, I was going to keep it and add it to my Card Boutique, but when she saw it, she wanted it, too! I think this little elephant is just adorable and I will be using this stamp set again very soon.

And that's all I have for you today. Thank you so much for visiting. Have a fabulous Friday and a wonderful weekend!

Blessings~


supplies~ 
stamp sets: Elephant Hearts(Sweet Stamp Shop) grass stamp-Critters on the Savanna(Lawn Fawn)
card stock: 80#, 100# white Recollections card stock(Michael's)
patterned paper: Let's Polka 6x6 petite paper pad(Lawn Fawn)
ink: Black Licorice(Lawn Fawn)  Broken China Distress Ink(Ranger)  Old Olive(Stampin' Up!)
dies: Journaling Card(Lawn Fawn)
bling: clear Wink of Stella glitter brush(Zig)
other: Crystal Effects(Stampin' Up!)

Wednesday, August 12, 2015

Amigurumi Bear Birthday Card

Hello Friends! I had a request for some cards for kids. I have been collecting Lawn Fawn stamp sets for some time now and have barely used any of them. To be honest, I find creating the scenes a bit intimidating. But...I have pulled out several sets and I will begin to use them in the next few days. I am really excited about this request because I don't usually make cards for kids. For today, I used a cute digital image I purchased a while back from Birdie Brown. She no longer has her shop on Etsy, but she is an illustrator for My Favorite Things, so you can find her designs there now.

I chose to work with the Amigurumi Bear and I created a 4bar sized card. I think they are the perfect size for kids.


You may remember this little guy from the 30 Day Coloring Challenge. He was my coloring project one evening. You can see that post HERE. I printed him onto smooth white card stock and cut him out with my Silhouette Cameo. Then I colored him with colored pencils, blended out with Gamsol and blending stumps.

I used two pieces of patterned paper from Lawn Fawn's Into the Woods 6x6 paper pad to create the background on my card base. I die cut the green paper with the Lawn Fawn Grassy Border die, then ran that and the cloud paper thru my die cutting machine with the Simon Says Stamp Stitched Rectangle die. I matted the paper onto a piece of blue card stock and then adhered the little bear with dimensional adhesive. I stamped the greeting onto a strip of card stock with Versamark ink and sprinkled on some fine detail white embossing powder. I heat set that and let it cool. Then I die cut the edge of the strip with the Stitched Rectangle die, so the stitching would be consistent around the entire card panel. I adhered that onto the focal panel and then went to work on the inside of the card.


I like to decorate the insides of my cards, but I try to keep it simple. I die cut a panel using the Stitched Rectangle die and matted that with blue card stock. I used the cloud stamps from the Lawn Fawn Into the Woods stamp set and simply added the sentiment underneath. There's plenty of room left for a message.

And that is all from me today! I thank you so much for stopping by! Have a terrific Thursday!

Blessings~


supplies~ 
digital stamp: Amigurumi Bear(Birdie Brown)
stamp set: "It's Your Day"-Happy and Smile(Simon Says Stamp)  "Happy Birthday to You"- Happy Birthday  clouds are from Into the Woods(Lawn Fawn)
card stock: 80lb, 110lb Solar White(Neenah)  Baja Breeze(Stampin' Up!)
patterned paper: Into the Woods 6x6 Paper Pad(Lawn Fawn)
ink: Versamark(Tsukineko)  Heavenly Blue(Close to My Heart)  Lucky Limeade(Stampin' Up!)
dies: Stitched Rectangle(Simon Says Stamp)  Grassy Border(Lawn Fawn)
coloring medium: Prismacolor Colored Pencils
other: Silhouette Cameo  Gamsol(Inky Antics)  Fine Detail White embossing powder(Simon Says Stamp)

Thursday, March 6, 2014

200th Challenge Blog Hop with MelJen's Designs

**THIS CHALLENGE HAS ENDED**

We're doing the happy dance as we celebrate our 200th Challenge!


Join us as we celebrate this milestone with a very special BLOG HOP and CELEBRATION CHALLENGE where we give you the gift of FREE digital stamps!

Hop through the blogs of our Design Team for a chance to win the digital stamp that they used on their project!  In order to win, you must leave a comment & your e-mail on their blog posts.  ONE friend will be randomly chosen from every DT Member to win the digital stamp that the DT Member used on her project!

And then, you'll want to visit the DT Challenge blog and join us for this weeks challenge. The theme is...

Celebration!

Create a card or project that spotlights a celebration...could be birthday, anniversary, graduation, any celebration!   THREE friends will be randomly chosen to win TWO digital stamps of your choice. 

Please remember that you must use a MelJen's Designs digital stamp to participate.
Entries that do not use a MelJen's Designs digital stamp will be deleted before the random draw.

Winners will be announced on each DT Member's blog and on the MelJen's Design Team blog on
 Monday, March 17, 2014

**THIS CHALLENGE HAS ENDED**


I chose to create a card in a box, using the absolutely adorable GRATS Cupcake digital stamp.


This was so fun to make! I printed the digital stamp onto white card stock and die cut it with my Silhouette Cameo. Then I colored it up with Copic markers. Then as usual, I went nuts with the blingy bling! I added crystal glitter to the letters, gold glitter on the little star, clear Wink of Stella to the frosting, glitter pen to all the lines and swirls and finished off the image with lots of bitty gems. To create the balloons, I used an oval Nestabilities die. And for the balloon knot, I used the feet of the owl from a Stampin' Up! Owl punch. I sponged the pieces using their coordinating inks and I used a white gel pen to create a highlight, then tied on a bit of baker's twine. Next, I adhered all of the card elements to pieces of acetate and then adhered them onto the box.


Here is how it looks from the back. I added more sponged balloons, so the backside would look nice also and I left plenty of room for writing a message.


The card folds flat for mailing, but because it is an awkward size, I had to create an envelope for it using my envelope punch board. 


It really does fit inside the envelope! The finished card measures 7 1/2 x 6 1/4 when folded flat.  There are many tutorials on YouTube that demonstrate how to create a smaller version of the card in a box. And many of them fit into a standard sized envelope. Those are fun to make, as well, I just wanted something BIGGER for this special occasion!


So that's it from me. Don't forget to leave a comment, along with your e-mail address so we know how to contact you if you win the GRATS Cupcake digi! Best of luck to you all!

Thank you so much for hopping with us today. Your next stop on the Hop is with the very lovely and talented Celine.  Enjoy!

If you get lost along the way or need to take a break, click HERE to go to the MelJen's DT Blog for the master blog hop list.

**THIS CHALLENGE HAS ENDED**

Blessings~


supplies~
digital stamp: GRATS Cupcake(MelJen's Designs)
stamps: Pinwheel-sentiment(Close To My Heart/SOM)  Sketched Birthday-balloons on back panel(Stampin' Up!) Happy 4th-little stars on back panel(Lawn Fawn) 
card stock: Neenah Solar White(Simon Says Stamp)   Gumball Green, Crisp Cantaloupe, Bermuda Bay, Raspberry Ripple(Stampin' Up!)
patterned paper: Birthday Basics(Stampin' Up!)
ink: Gumball Green, Crisp Cantaloupe, Bermuda Bay, Raspberry Ripple(Stampin' Up!)
dies: Classic Oval Large, Classic Oval Small Petite, Classic Scallop Oval Small Petite Nestabilities(Spellbinders)
punches: Owl Builder(Stampin' Up!)  Envelope Punch Board(WeRMemory Keepers)
bling: Tiny Twinkles(Taylored Expressions)  Crystal, Yellow Gold glitter(Martha Stewart Crafts)  Clear Wink of Stella glitter brush(Zig)  Clear Stardust glitter pen(Sakura) blue sequins from my stash
other: Baker's Twine(Martha Stewart Crafts)  White gel pen(Sakura)

Thursday, November 21, 2013

Thursday Challenge @ MelJen's Designs!

Hello Friends!  It's time for another fun challenge at  MelJen's Designs! This week the challenge is

"BLACK OUT"
Use black card stock as your card base

Pretty easy to do, right? Yes! Here is my sample featuring the adorable image, Leaf Pile Play.

click to enlarge

This is one happy little boy! I printed him onto my favorite card stock, which had some feathering and bleeding over issues this time! *sad face* I hope the formulation of the paper didn't change. I had to color two, because the feathering created a huge mess on my first piece. Anywho...after coloring with Copic markers, I die cut the image and dusted on some blue ink. I added a few shiny leaves from my stash and a little sentiment to convey his feelings over jumping in that pile of leaves!

I hope you take a moment to join our challenge this week. You could win FREE digital stamps of your choice. But remember, you must use a MelJen's Designs image to be included in the random drawing. Also...don't forget that the entire MelJen's Shop is on SALE this month! Stop by and see What's New.

Thanks for visiting me today...I appreciate it!


Blessings~


supplies~ 
digital stamp: Leaf PilePlay(MelJen's Designs)
stamp: 'woo-hoo'- Critters in the Forest(Lawn Fawn)
card stock: Cryogen Iridescent White   Basic Black(Stampin' Up!)   Summer Sunrise(Papertrey Ink)
patterned paper: Grateful Heart(GinaK Designs)
ink: Versafine Onyx Black(Tsukineko)  Broken China Distress Ink(Ranger)
dies: Classic Square Nestabilities(Spellbinders)
other: Rustic Twine(Papertrey Ink)   Copic markers