Showing posts with label Challenge. Show all posts

Thursday, January 21, 2016

From The Heart Stamps Monthly Challenge

Hello Friends! It's time for my card share for the From The Heart Stamps Monthly Challenge. This is a monthly challenge where everyone is a winner. All we do is create a card with the digital stamp of the month and then the following month, we receive a new digital stamp for FREE! It's a win win! And as soon as you're finished here, please buzz over to From The Heart Stamps, because there are some super cute digis over there and you just have to see them for yourself!

Okay...this month, we were given the Cozy Kittens set. Sooooo very cute. Two adorable, cuddly kitties and FOUR sentiments, including I Love You which can be used on many other projects. AND, don't forget, I got this for FREE, just by participating in the challenge last month. This set is also for sale in the online shop.


And here is the card I created...


I printed the images onto Bristol, using the 'fast draft' setting. Then, as I always do, I went over the image with a kneaded eraser. I do this because the eraser lifts off excess ink without smearing or leaving shavings or residue behind. Then, I gave the image a blast with my heat tool. Here is a picture of a kneaded eraser. It can be 'kneaded' into whatever shape you like and once it gets dirty, just keep kneading it and it self cleans. These are really nice, a throwback to my college days when I was in design class. I purchased mine from Hobby Lobby, but I am sure they can be found in any art supply store.


Baaaack to the card...Bristol is not watercolor paper, so I used a damp brush to  move the color around. My technique of choice with the Zigs is a bit different than the one I use with Distress markers. With the Zigs, I lay down color where I want the darkest areas(shading) to be and then, using a damp brush, I start painting in the white area of the image and pull color into it. This way I can make sure I keep my shading and that it gradually gets lighter. After all of the watercoloring was finished, I popped the image back into the circle die and lightly dusted the edges with Tumbled Glass Distress ink.


I added sparkly accents using a Clear Stardust glitter pen and I put a touch of Crystal Effects on their little noses. Then I scattered a few die cut hearts around, went over them with a Clear Wink of Stella and gave them a coat of Glossy Accents, which turned out to be a HUGE mistake, because it changed the color of the card stock and made it darker. I die cut the hearts from the same color card stock that I used on the front of the card and just look at the difference! And that is why I rarely use Glossy Accents! Ugh! I'm going to toss it in the garbage. Crystal Effects does not change the color of things.

I finished the inside of the card, too. Really very simple, but always makes for a nice presentation. This sentiment is also included in the digi set.

You can see here that I did the same thing with the hearts. They actually look black on my monitor. I can assure you, they are not black...more of a deep burgundy with lots of sparkle.

And that is that! Thank you for stopping by! I appreciate the visit!

Blessings~

supplies~
digital stamp: Cozy Kittens(From The Heart Stamps) 
card stock: Bashful Blue, Cherry Cobbler(Stampin' Up!)
patterned paper: Love Me 6x6 paper pad(My Minds Eye)
specialty paper: Bristol Smooth(Strathmore)
ink: Tumbled Glass Distress(Ranger)
dies: Stitched Rectangle, Stitched Circle(Simon Says Stamp)  Hearts(Lawn Fawn)  Stitched Journaling Card(Lawn Fawn)
coloring medium: Zig Clean Color Real Brush pens(Kuretake)
bling: Clear Stardust glitter pen(Sakura)
other: Crystal Effects(Stampin' Up!)  ribbon(Offray)

Monday, May 11, 2015

Hey There, Chickadee!

Hello Friends! I hope all the Mommas had a wonderful Mother's Day. I sure did. On Saturday, I treated my mother-in-law to a deluxe spa pedicure, now both of us have really cute toesies. Then, later on that evening, we took both of the mom's out for Japanese food. I love sushi and the restaurant we went to has a huge sushi bar with all sorts of delectable edibles, including fresh oysters. Big, plump, juicy oysters on the half shell. Yum-O! Well, I slurped up one of those oysters and felt something hard in my mouth and guess what?! There was a PEARL in my oyster! LoL! No kidding! It is really tiny, but it's still a pearl. I'm not sure what I'm going to do with it yet. I may add it to my Origami Owl locket. Just had to share that! Anyway...Onto my card for the day.

I wanted to do something a little different, so I pulled out another old set from Papertrey Ink, Everyday Button Bits. Remember when buttons were all the rage with card makers? This stamp set uses buttons to complete the image. Take a look...


I wanted to keep the design CAS and let those cute little birds do their thing. After I finished the stamping, I colored the beaks with Spectrum Noir colored pencils. I colored their feet and the ground with Copic markers. I stamped their side feathers using coordinating inks, then I fussy cut them out, adhered them with glue dots and gave them a brush over with a Clear Wink of Stella glitter brush. I felt like I had too much white space at the top, so I added the polka dot patterned paper and notched out the sides of my panel(thank you, Patti for this tip!) so I could add some Baker's Twine.

I finished off the inside of the card, too.


I created my sentiment using a few different stamp sets. This card is for a friend who had surgery recently. I really LOVE the "Sending" in the Simon Says Stamp Happy Thoughts stamp set. It's the handwriting of Kristina Werner and I think it's soooo cute! Anywho...I added a strip of the same patterned paper that I used on the front of the card to tie everything together. The little hearts have a coat of Clear Wink of Stella on them, because I love my sparkle!

***I am entering this card into the Simon Says Stamp Wednesday Challenge - LET'S GET SENTIMENTAL ***

And that is it from me today. Thank you so much for stopping by. I appreciate the visit.

Blessings~


supplies~ 
stamps: Everyday Button Bits(Papertrey Ink)  Happy Thoughts(Simon Says Stamp)  Express Yourself(Stampin' Up!)
card stock: 80# and 110# Neenah Solar White(Simon Says Stamp)  Lemon Tart(Papertrey Ink)
patterned paper: Polka Dot Parade(Papertrey Ink)
ink: Black Licorice Hybrid(My Favorite Things)  Ripe Avocado, Aqua Mist, Summer Sunrise(Papertrey Ink)  Strawberry Slush(Stampin' Up!)
punches: Scalloped Border(Stampin' Up!)
bling: Clear Wink of Stella glitter brush(Zig)
coloring media: Spectrum Noir-Essentials Colored Pencils, Copic markers
other: Buttercream Baker's Twine(The Twinery)  Aqua Mist, Lemon Tart buttons(Papertrey Ink)

Thursday, March 5, 2015

Day Two - 30 Day Coloring Challenge

Hello Friends! It's Day Two of the 30 Day Coloring Challenge and I'm excited to share what I've done, so let's get right to it! Oh! But before I do, I want to let you all know that ANYONE can join in this challenge. You can color all 30 days, you can color for two days, you can stop and start. You can share what you've colored or not. It's all up to you. Please take a moment, after you're finished here and check it out. This is all for fun to help us set aside some time to just relax and color.

Okay on to my coloring for the day. I decided to dig out some old stamps that I fell in love with over 20 years ago! They are wood mounted and stained from years of use, but they stamp just fine. I knew I wanted to watercolor today and I chose to use Distress Inks. They are perfect for quick and easy watercoloring because they react so well with water. I also used Tim Holtz Distress Watercolor Cardstock. I like that it's so bright and white.


Watercolor card stock has a smooth side and a textured side. I prefer to use the textured side because it makes the piece more tactile and interesting. And although I show two stamps in the picture, I chose to work with the beautiful rose stamp today.

To begin, I stamped the image using Versamark ink and embossed it with gold embossing powder. Then I taped it down to a board, to help prevent warping while I watercolored. See that little bit of tape in the upper right corner of the photo below? That is where I stick my paint brushes when they are wet. It keeps them from rolling off my table. :)

Once everything was in place, it was time to color. I used my Tim Holtz non-stick craft sheet as a palette and just "stamped" my ink pad right onto it. It makes blending and color mixing a breeze and it's easy to clean up, too! I started with the leaves...


Watercoloring an embossed image is really easy and anyone can do it. The embossing creates little walls so the colors stay contained in their appropriate areas. I love this technique! When I watercolor, I like to let the piece air dry. That is especially important when the image is embossed. I wouldn't want to take a chance of re-heating my embossing powder and ruining my project. You can see my tape in the corner, in action in this picture. After I finished with the leaves, I colored the rose.

And here is my finished piece.


I only used one color of Distress Ink for the leaves and one for the rose. I thought I would need more, but I just used less water/more ink to create the shading. I added a subtle wash of blue around the image and in real life it pops! I always have difficulty capturing pale colors with my lighting. But, I like how it turned out. The gold embossing powder adds a bit of sparkle and shine and that makes me smile. I think I may have to use this to make a Mother's Day card...later. *wink*  But for now, this will go into a drawer of colored images and I will start to prepare for Day Three!

Thank you so very much for stopping by today! I appreciate the visit! See you tomorrow!


Blessings~


supplies~
stamp: Rosa-K023 (Personal Stamp Exchange)
card stock: Tim Holtz Distress Watercolor card stock(Ranger)
ink: Versamark(Tsukineko)   Spun Sugar, Peeled Paint, Gathered Twigs, Broken China Distress ink(Ranger)
other: Metallic Gold Rich Regular embossing powder(WOW)

Tuesday, March 3, 2015

The Daily Marker 30 Day Coloring Challenge

Hello Friends! I'm here today to share something that I think is going to be SUPER fun! Just like the title of my post says, it's a 30 Day Coloring Challenge. The challenge has been issued by the very talented Kathy Racoosin of The Daily Marker blog.

The idea behind the challenge is to COLOR. That's it. Just color to color...not to make a card, or project, just have fun coloring. We are to take some time each day for thirty days, even if it's just 10 minutes, to color.  I LOVE that! This is an opportunity to explore new techniques and to use products that have been neglected or perhaps it's time to invest in a few new items to add to your coloring media collection. I'm super excited about joining the challenge because coloring is my first love and I look forward to getting into my studio and having a fun coloring session.

Our first order of business was to organize our supplies. I decided to "display" my coloring media on one of my work surfaces. That way, I can select which medium I would like to use quickly and easily. My stamps and various types of paper are nearby, as well.

click to enlarge

The challenge starts on Wednesday, March 4, 2015. It's going to be fun! Won't you join us?!

To learn more about the challenge, click HERE.

Blessings~


supplies ~

Spectrum Noir Colored Pencils, The Essentials set ~ Prismacolor Colored Pencils ~ Peerless Watercolors ~ Copic Markers ~ Kuretake Gansai Tambi Watercolors ~ Tim Holtz Distress Markers   Tim Holtz Distress Inks ~ Derwent Inktense Pencils ~ Various paint brushes: Claudine Hellmuth, Royal Aqualon, Princeton Neptune, Grumbacher ~ Koi Waterbrushes ~ Prismacolor Watercolor Pencils  

Monday, December 1, 2014

Season's Greetings!

Hello Friends! I've got a really cute card to share today. I made it using supplies that were included in the November 2014 Simon Says Stamp card kit. I just love the Lawn Fawn papers in the kit and that is what my card showcases...


This was a SUPER quick and easy card to make. I let the patterned paper be the star of the show. I simply trimmed down this adorable paper and adhered it to my card base. I stamped the greeting with Versamark ink and embossed it with Early Espresso embossing powder. Then I added a few Pretty Pink Posh Sparkling Clear sequins. And to finish it off, I tied on a bit of Mistletoe Hemp Cord. I just love the little scene printed on this paper!

Then, I worked on the inside of the card.


I used Early Espresso ink and a stamp set from Papertrey Ink to stamp the message. Then I adhered a strip of coordinating patterned paper to tie the whole thing together.

*I am entering this card into the ANYTHING GOES challenge at Simon Says Stamp.*

And that was all there was to it! Cute, quick and simple! Thank you for stopping by today.


Blessings~


supplies~
stamps, patterned paper and card stock are from the November 2014 Simon Says Stamp Card Kit.
ink: Versamark(Tsukineko)  Early Espresso(Stampin' Up!)
stamp set: (inside greeting) Holiday Greetings(Papertrey Ink)
bling: 4mm, 6mm Sparkling Clear Sequins(Pretty Pink Posh)
other: Mistletoe Lawn Trimmings Hemp Cord(Lawn Fawn)  Early Espresso embossing powder(Stampin' Up!)

Friday, October 31, 2014

Happy Halloween!

Hello Friends! Happy Halloween! I've got a few things to share with you today...let's jump right in.

I am really putting some miles on the Goodie Bag die from Lawn Fawn. LOVE that thing! So, for Halloween, I made these...


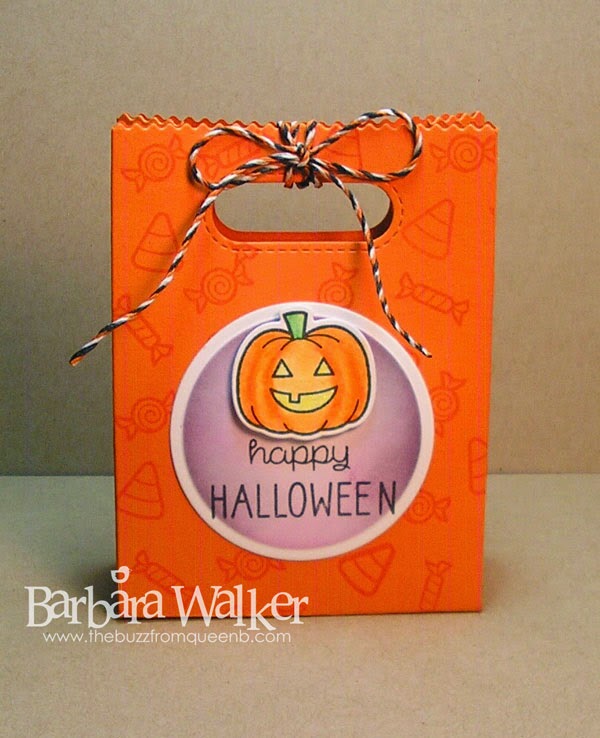
After die cutting the card stock, I assembled the bags. I stamped the sweet little jack-o-lantern onto Neenah paper and colored them with colored pencils from the Spectrum Noir Essentials set. I blended the pencil with gamsol and added clear Wink of Stella to the eyes and mouth. Then, I die cut the pumpkins using the coordinating Lawn Fawn die. I love LF dies, because they cut the images perfectly, leaving just a slight white border. SO CUTE! Next, I die cut the circles and sponged on Distress Inks while they were still in the die. I like the crisp white border I get when I do it this way. I sponged on Seedless Preserves first and then added a tiny bit of Black Soot. I stamped the greeting using My Favorite Things Black Licorice Hybrid ink and adhered the circle onto the bag. Then I adhered the pumpkins with dimensional tape.


Using images from the stamp set, I random stamped the little candies using Versamark ink. That's a quick and easy way to turn flat card stock into something special, by giving it a nice tone on tone look.  I filled the goodie bags with treats and tied it closed with Spooky Hemp Twine, also from Lawn Fawn.

Cute, fun project that I know will be well received by the little goblins I plan on giving them to. :)

*I am entering this project into the ANYTHING GOES challenge at Simon Says Stamp.*


That's all I have for today. Thanks for stopping by, I appreciate the visit. Have a Happy and SAFE Halloween!

Blessings~


supplies~
stamp set: Spooktacular(Lawn Fawn)
card stock: Vibrant Violet(GinaK Designs)  Orange Zest(Papertrey Ink)  Basic Black(Stampin' Up!)  Neenah Solar White(Simon Says Stamp)
ink: Black Licorice Hybrid(My Favorite Things)  Seedless Preserves, Black Soot Distress Ink(Ranger)
dies: Classic Circle Nestabilities(Spellbinders)  Spooktacular dies(Lawn Fawn)
bling: Clear Wink of Stella glitter brush(Zig)
coloring medium: Spectrum Noir colored pencils ~ The Essentials set
other: Spooky Hemp Twine(Lawn Fawn)  Gamsol(Inky Antics)  blending stumps(Dick Blick)

Sunday, October 19, 2014

Eeep! I'm a Peep!

Hello Friends! I've got some exciting news to share today. A few days ago I posted this card...


and entered it into the challenge over at Power Poppy. You can see the original post HERE. Well...my card was selected for the Power Peep of the Week! Not only did I receive lovely comments from members of the Bloom Brigade Design Team, I also got an email from Marcella Hawley!! Well, when I saw that you could have just mopped me right up off the floor! AND...I was given this super cool badge to display on my blog, too!


This could not have come at a more perfect time...big THANK YOU to the wonderful peeps at Power Poppy. 

If you haven't seen the Power Poppy site, you're really missing out! Take a moment to look at the what the Design Team has to share...there is a ton of talent over there. And don't forget to look at the digital images if you're into instant gratification, like me!

Have a great Sunday and thanks for stopping by.

Blessings~

Saturday, October 11, 2014

Watercolored Geraniums

Hello Friends! Happy Saturday! The card I am sharing today features an image from one of my favorite illustrators...Marcella Hawley! She worked with a company called Flourishes for years and I admired her artwork and purchased a few stamp sets she designed. Well, the sad day came when Flourishes closed it's doors. I was literally locked out from getting anymore MH stamp sets. BUT...I was browsing around on Instagram and spotted a picture of a card that featured one of the stamps that I purchased from Flourishes. I contacted the person who posted and we messaged back and forth for a bit and she shared that Marcella Hawley was still in business and selling her beautiful artwork on a site called Power Poppy . (Big THANK YOU, to Patti from Patti's Stamping Studio for sharing this information with me.) I was thrilled and immediately went to the site and discovered that Marcella was selling stamps and digital images. Because I'm an instant gratification kind of gal, I purchased several digital images and started an extensive wish list for actual stamp sets that I would like.

Soooo...that brings me to my card share. I chose to work with the lovely Geraniums digital image. I absolutely LOVE geraniums. When I was growing up, my grandmother had pots and pots of geraniums on her patio, all different colors and types; many were scented with wonderful fragrances like, rose, mint, citrus and fruit. I loved squeezing the leaves and smelling their scents on my fingers for hours. Okay...back to my card. I'm chatty today!

Here is my card...

click to enlarge

To begin, I re-colored the image on my computer and instead of having a black outline, I changed it to light gray. And I printed this beauty onto watercolor paper and let it cure for a day or two. Then, using a kneadable eraser, I went over the image to pick up more of the printer ink. I also heat set it. Because I knew I wanted to watercolor this image, I had to do all that I could to insure that the ink would not run and smear once I added water to it. Watercolor paper has a textured side and a smooth side. Many artists prefer the smooth side, but I like to use the textured side. I like that slightly bumpy look. It creates little valley's that capture the color and add to the overall charm of the card, I think.


I colored the image in many stages so that I would not lose any of the gorgeous detail that Marcella put into it. I also wanted to make sure that I had depth and dimension and not just a flat image. So, using a combination of Distress Inks and Distress Markers, I watercolored. And it was pure bliss! I loved every minute of it. I am one of 'those people' who likes to let the image dry naturally, instead of using a heat tool to speed things along. I just like the results I get when doing it this way. Can I tell you a secret? I think watercoloring is my favorite. Shhh! Don't tell my Copic markers. :)

So, after the image was completely dry, I went over the floral parts with a clear Wink of Stella glitter MARKER, not the brush. I used a MARKER. Like these...


They impart the same sparkle and beauty that we enjoy with the brushes, but these are more compatible with watercolored images because they don't reactivate the watercolors like the brushes can. I reach for these often, they are fabulous.


I chose to use black as a matting on the geraniums to help the image pop. I paired the matted piece with gingham to evoke a country feel. Don't you just love gingham? I stamped the sentiment onto a scrap of watercolor paper, so the two papers would match, then I die cut it and matted it with black. I adhered both the focal and the sentiment with dimensional adhesive. I really wanted to add ribbon, but couldn't figure out where it would go, so I left it off and added the single pearl to the flower center and a few Mossy Green sequins from Pretty Pink Posh.  And that finished my card!

I had so much fun watercoloring this image and I'm looking forward to playing with more Power Poppy images. Hey! If you get a moment, visit the Power Poppy site. They have just released their Holiday Collection and it's gorgeous. If you want images that are perfect for all sorts of coloring media, make sure you stop by and take a peek.

I am entering this card into a few challenges:
Peep of the Week at Power Poppy
Use Watercolors  at Simon Says Stamp


Well, if you've made it to the end of this chatty post, God bless you! Thank you for visiting. Enjoy your weekend.


Blessings~


supplies~
digital image: Geraniums(Power Poppy)
stamp set: sentiment-Winter Wreath(Avery Elle)
card stock: Basic Black(Stampin' Up!)
specialty paper: 140lb Cold Press Watercolor Paper(Strathmore)
patterned paper: Olive Gingham-retired(Close to My Heart)  red strip-Everyday Enchanment-retired(Stampin' Up!)
ink: Versafine Onyx Black(Tsukineko)
dies: Petite Oval, Petite Oval Scallops, Circle, Circle Scallops Nestabilities(Spellbinders)
bling: Clear Wink of Stella Glitter Marker(Zig)  pearl(Stampin' Up!)  Mossy Green 4mm sequins(Pretty Pink Posh)
coloring medium: Worn Lipstick, Barn Door, Shabby Shutters, Peeled Paint, Crushed Olive Distress Inks and Markers(Ranger)

Friday, September 12, 2014

Watercoloring with Distress Inks

Hello Friends! Happy Friday. I decided to create another card using Persian Motifs by Altenew. I think it may be my new favorite set; it's sooo pretty and very versatile. On my previous card, HERE, I watercolored the images with Peerless Watercolors. This time, I used Distress Inks. I used the same color palette, so I could enter it into the Altenew September Challenge.

For this card, I used the 'no line' watercoloring technique, demonstrated HERE, by Altenew owner, Tasnim Ahmed. It's a super fun technique, you just have to exercise a little patience.

Here's my card...

click to enlarge
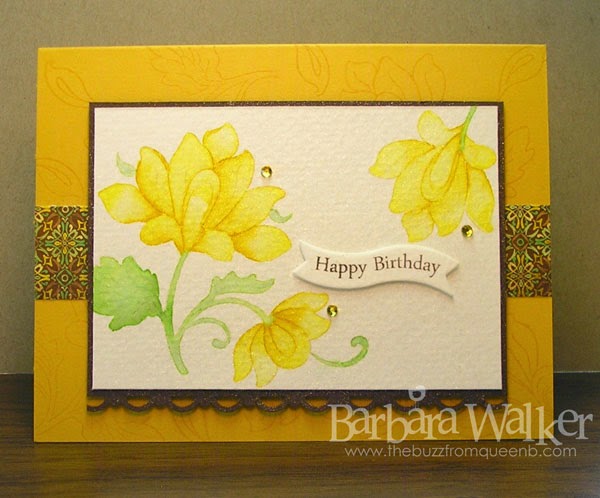
I started out by stamping the images onto the smooth side of a piece of 140lb watercolor paper, using Antique Linen Distress Ink. As noted in the video, the lighter color ink allows for the lines of the stamped image to 'disappear', so that the end result looks hand-painted. After stamping, I brushed clear water onto the image and then, dabbed dots of color onto it and let the water do the blending for me. I find that it's best to let the image dry naturally, rather than to use a heat tool to speed up the drying time...that's where the patience comes in. After the image was dry, I was able to go back in and add more water and ink in the areas that were still a bit too white for me.


Once the focal panel was finished, I mounted it onto a piece of brown card stock and then gave it a good blast of my shimmer spray. I love my Wink of Stella glitter brush, but sometimes it can re-activate the Distress Ink and cause it to move around, so that is why I used my shimmer spray instead.  I just love all that sparkle!


And, it may be a bit difficult to see in the photographs, but I random stamped the floral image on the card base for a little added interest. Then I adhered a strip of patterned paper and mounted the focal panel onto the card base. Next, I stamped the greeting, die cut it and mounted it with dimensional adhesive and added a few gems to finish the card.

I love the look of watercoloring on cards...it's so fun and really easy to do.

*I am entering this card into the Altenew September Challenge - From the Craft Room: Lime Lemonade

That's all I have for today. Have a wonderful weekend.  Thanks for the visit!

Blessings~


supplies~
stamp set: Persian Motifs(Altenew)
card stock: Crushed Curry(Stampin' Up!)   Dark Chocolate(Papertrey Ink)
patterned paper: Origins Collection(Basic Grey)
specialty paper: 140lb Cold Press Watercolor paper(Strathmore)
ink: Antique Linen, Mustard Seed, Squeezed Lemonade, Mowed Lawn, Peeled Paint Distress Inks,(Ranger)  Chocolate(Close to My Heart) Versamark(Tsukineko)
punches: Scallop Trim Border Punch(Stampin' Up!)
dies: Bitty Banners Framelits(Stampin' Up!)
bling: Assorted gems(Me and My Big Ideas)

Saturday, September 6, 2014

Thinking of You

Hello Friends! I hope your weekend has been wonderful so far. I have a card to share with you today, featuring a stamp set from a new stamp company called, Altenew. This stamp company is the creation of two VERY talented ladies, Tasnim Ahmed and Jennifer Rzasa. I have had the pleasure of having them for teachers in the Watercolor for Cardmakers Online Class. Both ladies are fabulous with watercolors and if you haven't visited their blogs, I encourage you to hop on over.

My card was inspired by this beauty HERE, created by Jennifer McGuire. The inspiration photo from the Altenew September challenge inspired my color palette.


click to enlarge

I stamped the images from Altenew's Persian Motifs set with Versamark ink onto the smooth side of a piece of Tim Holtz Distress Watercolor card stock and then embossed them with White Pearl embossing powder. Then, I watercolored the images using Peerless Watercolors...LOVE, LOVE, LOVE those watercolors. I used the same technique that Jennifer McGuire showed in her video, linked above. It's really very easy to do and the results are always different and always nice. You really can't go wrong with watercoloring an embossed image. It's a super fun technique and I hope you'll give it a try.

After my images were dry, I went over the petals with a clear Wink of Stella glitter brush, cuz I gotta have my sparkle! :)


Next, I stamped the sentiment. Then I used a piece of patterned paper to mat the focal panel. And finally, I adhered the focal panel onto my card base with foam tape and added a few pearls to finish it off.

**I am entering this card into a few challenges...
Altenew September Challenge - From the Craft Room: Lime Lemonade
Simon Says Stamp - Stamp It Challenge and Blog Hop


That's it for me!  Thanks for stopping by!


Blessings~


click to enlarge


supplies~
stamp sets: Persian Motifs(Altenew)  Sweet Havana(Mama Elephant)
card stock: Neenah White 110lb   Tim Holtz Distress Watercolor(Ranger)
patterned paper: Origins collection(Basic Grey)
ink: Versamark(Tsukineko)  Soft Suede(Stampin' Up!)
other: Clear Wink of Stella glitter brush(Zig)  Champagne pearls(Kaiser Craft)  Peerless Watercolor Bonus Pack  White Pearl Super Fine embossing powder(WOW!)

Friday, August 29, 2014

All You Need is Ice Cream!

Hello Friends! I have another ice cream card to share with you. This is such a fun stamp set and it was my desire to create a card using each of the stamps in the set, but...life got in the way. I've used the same image as my previous card, but rather than use glitter, I used Prismacolor pencils.


I stamped the image onto Papertrey Ink's Stampers Select card stock. I used Memento Rich Cocoa ink for the stamping. Then I colored the images and blended everything out with Gamsol. I used the polka dot stamp from the set and Orange Peel ink from Simon Says Stamp to create that little border on the bottom. I stamped the greeting in Audrey Blue ink, also from Simon Says Stamp...LOVE that color! Then I adhered all the pieces and gave all of the scoops of ice cream a coating of Rock Candy Distress Stickles.

Here's a closer look for you. The Rock Candy Stickles leave chunks of glitter that look like sugar! I applied it with a paint brush to get even coverage. Make sure you clean the paint brush immediately, so it doesn't get ruined.


I added a few Sprinkles from the Doodlebug Spring assortment and tied on a bit of Caribbean Baker's Twine to finish off the focal. A strip of patterned paper on my card base adds a splash of color and also served as inspiration for the colors on the ice cream cone.

*I am entering this card into the ANYTHING GOES challenge at Simon Says Stamp.*

Thank you so much for stopping by today. Have a wonderful and SAFE Labor Day Weekend.

Blessings~


supplies~
stamps, Green Apple card stock, patterned papers from the August 2014 Simon Says Stamp Card kit.
card stock: Stamper's Select White(Papertrey Ink)
ink: Memento Rich Cocoa(Tsukineko)  Orange Peel, Audrey Blue(Simon Says Stamp)
other: Clear Rock Candy Distress Stickles(Ranger)  Spring Sprinkles Assortment(Doodlebug)  Caribbean Baker's Twine(The Twinery) Prismacolor Colored Pencils  Gamsol(Inky Antics)

Monday, June 30, 2014

You Are My Favorite Friend...

Hello Friends! Happy Monday!  I managed to squeeze in one more card using the June Simon Says Stamp Card kit. I also used some of the new goodies I shared in my previous post. Let's get right to it...


I random stamped the little flower onto watercolor paper, using Versamark ink. Then I embossed them using a really pretty pearl powder. Sooo gorgeous in real life! Next, I watercolored each flower, using my new Peerless watercolors....which I LOVE! I only used one color here, it's called Geranium Pink. Once the flowers were dry, I added some sparkle with a clear Wink of Stella brush. And, I random stamped the little starburst in Delicata gold ink. I die cut the background piece and the focal, using my new postage stamp edge die. I also die cut a strip of the mint striped paper and added that to the bottom of the focal. I put on a bit of twine to cover the seam where the two papers met. I adhered the focal with foam tape and added enamel dots. Then I went nuts with sequins!

Here is a close-up for you...


Just look at all that sparkle! It really makes me happy. LoL! Anyway...that's all I have to share today. Can you believe that June is over?! It just flew by!

***I am entering this card into the ANYTHING GOES challenge at Simon Says Stamp.***

Thank you for visiting me today. Enjoy your Monday.

Blessings~


supplies~
stamps, patterned paper, enamel dots from the June Simon Says Stamp kit
card stock: Neenah Solar White 80lb and 110lb(Simon Says Stamp)
specialty paper: Tim Holtz Distress Watercolor card stock(Ranger)
ink: Versamark, Delicata Gold(Tsukineko)
dies: Postage Stamp Edge(Simon Says Stamp)
bling: Sparkling Clear, Pink Peonies 4mm, Pink Blush 6mm sequins(Pretty Pink Posh)
other: Peerless Transparent Watercolors~Geranium Pink  Pearl Ultra Fine embossing powder(Wow) Blossom Baker's Twine(The Twinery)