Showing posts with label Glitter. Show all posts

Thursday, April 25, 2013

Thursday Challenge @ MelJen's

Hello Friends! It's Thursday and there is a new challenge on the MelJen's Design Team blog. This week we have a sketch for you. I hope you will play along with us! Please remember, in order to be included in the random drawing for FREE digital stamps, you must use a MelJen's Designs image on your project. And the entire Shop is on SALE until April 30, so grab a new digi and join the fun!

 Here is my take...

click to enlarge

Lots and lots of layers on this one! I chose to feature the Lazy Susan Buggies digital stamp today. I'm in such a flower mood lately. I know these are lazy susans, but I wanted daisies. So, that is how I colored them. I used just a touch of blue marker to help the white pop. The little bees are darling, they have faces and they are smiling. Happy bees! There are little lady bugs on the flowers, too. This was such a fun image to color!

That's all I have for today. As usual, stop by the Design Team blog and take a look at what the other team members have created.

*I am entering this card in the "ANYTHING GOES" challenge at Simon Says Stamp.

Thank you for visiting! Have a great day.

Blessings~

materials~
digital stamp: Lazy Susan Buggies(MelJen's Designs)
card stock: white(Georgia Pacific)   Cryogen Iridescent White(Simon Says Stamp)   Barely Banana, Chocolate Chip(Stampin' Up!)
patterned paper: SunKiss Collection(Prima)
dies: Classic Circle, Scallop Circle Nestabilities(Spellbinders)
other: Circle Cutter(Martha Stewart Crafts)   Aqua Mist buttons and ribbon(Papertrey Ink)   Garnet glitter(Martha Stewart Crafts)   Dazzling Diamonds(Stampin' Up!)   Copic markers

Wednesday, April 17, 2013

Piece of Cake!

Hello Friends! I have another birthday card to share with you. I made this for one of my bestest best friends and TODAY is his birthday!  Happy Birthday, LC!


click to enlarge
Creating cards for men is always a challenge for me. I didn't want to go too child-like. But, this friend is such a kid-at-heart, I knew I couldn't go too serious either. So, I decided on just giving him a piece of cake! After I printed my image onto white card stock, I die cut it and dusted on a little distress ink. Then, I colored it with Copic markers. I used a technique called Pointillism on the cake to give the appearance of texture. It's just a bunch of dots! I colored the image with my base color, then I used three or four different color markers and just randomly dotted over it. It's really nice effect in real life. I used a white gel pen to create highlights on the frosting. The cherry, the cake filling and the chocolate curls get their shine from Crystal Effects. And finally, I added Liquid Applique and a bit of glitter to the whipped cream. I used a texture plate on the teal card stock. It's kind of hard to see, but it's confetti and party hats. I also gave the teal card stock a blast of shimmer spray.

Here is a little detail shot for you...

click to enlarge


And here is how I finished the inside...


That's all I have for you today! Thanks for stopping by! I appreciate the visit.


Blessings~


materials~ 
digital stamp: Piece of Cake(MelJen's Designs)
stamp sets:  Happy Birthday(Close to My Heart)   One in a Million(Stampin' Up!)
card stock: Neenah Solar White(Simon Says Stamp)   Chocolate Chip, Taken with Teal, Pumpkin Pie,(Stampin' Up!)
patterned paper: Stampin' Up!
ink: Chocolate Chip, Pumpkin Pie(Stampin' Up!)   Tea Dye Distress Ink(Ranger)
dies: Deckled Rectangles(Spellbinders)
other: Liquid Applique(Marvy)  Crystal Effects(Stampin' Up!)   crystal glitter(Martha Stewart Crafts)   gold shimmer spray(Blessed Designs by B.White gel pen, Clear Stardust pen(Sakura)   "Party" texture plate(Fiskars)   Copic markers

Tuesday, April 2, 2013

Design Team Share Day

Hello Friends! Today is my Design Team Share day on the MelJen's blog and boy do I have something wonderful to share with you! This month we are celebrating the 3 Year Anniversary of MelJen's Designs and YOU get the gifts! There are giveaways AND every image in the Shop is on sale for 50% off!!


Congrats to Melissa for 3 years of creating and sharing her cute and whimsical designs!

In honor of this festive occasion, I created cards featuring the Birthday Cupcake. If you've been following my blog, then you know how much I {heart} cupcakes! And Melissa draws some really cute ones. To see my cupcake card collection, click HERE. Okay, now on to today's cards. I decided to make two; one for her and one for him.

click to enlarge
I just LOVE this image! It's so much fun to color. It's printed on my favorite Cryogen Iridescent White card stock and colored with Copic markers. I kept the card design simple, so it is an easy one to mass produce. There is a lot of sparkle going on here. I used glitter, tiny twinkles and a glitter pen. Here is a look at how I finished the inside...


Again, it's very simple. I carried the dotted scallop border punch over to the inside. Little touches like this make simple cards special.

And now, here is the one for him...

click to enlarge

Another simple layout. I added a little sparkle to this one also. No glitter, though. And I know the frosting looks pink, it is not in real life. This is also printed on Cryogen and colored with Copic markers. I opted to use card stock and patterned paper to create interest behind the image, instead of ribbon.

Here is a look at the inside of this one.


Taking cues from the image, I decided to add a few stars along with repeating the stripe patterned paper.

Making cards like this is a quick and easy way to build up your stash. And I don't know about you, but I seem to always be in need of birthday cards.

Okay...are you ready for some fun? I am giving away the two cards I just shared. Yes, I am! To be entered into the random drawing, just leave a comment on this post and the winner will be announced on April 30.

Want some more fun? There is a MONTH LONG party going on, on the MelJen's Designs DT blog. You could win 3 digital stamps of your choice! Please visit the DT Blog for more information. And don't forget about the 50% Off Sale going on right now in the Shop! It's the perfect time to add to your collection.

Thank you so much for stopping in. I appreciate the visit! Don't forget to leave a comment to be entered to win the birthday cards. And then scoot on over to the DT blog to enter to win 3 digital stamps. Have a wonderful day.

Blessings~


materials ~

digital stamp: Birthday Cupcake(MelJen's Designs)
stamps: Happy Birthday(Close to My Heart)   Birthday Basics(Papertrey Ink)
card stock: Cryogen Iridescent White   Colonial White, Twilight, Buttercup(Close to My Heart)   Regal Rose(Stampin' Up!)
patterned paper: I Heart You from the With Love Collection(Pebbles)    Good Times(Close to My Heart)
ink: Hollyhock, Twilight(Close to My Heart)
punches: Dotted Scallop border(EK Success)  star punch(Creative Memories)
other: seam binding(Blessed Designs by B.)   Tiny Twinkles(Taylored Expressions)   Crystal, Sugar Cube glitter(Martha Stewart Crafts)   Clear Stardust pen(Sakura)

Friday, March 29, 2013

New Release Friday!

Hello Friends! Guess what? YES! There are new digital stamps in the Shop today!  They are super cute and one is the result of something I suggested. LOVE THAT!

Take a look...

Two super sweet images and I chose to work with the Flower Power Car.


click to enlarge


I printed the little car onto Neenah White card stock, die cut it and colored it with Copic markers. I added Crystal Effects to the headlights and the window. The flowers were colored then I added various colors of glitter to them. It's a simple little layout. I wanted to do something whimsical, because I'm giving this one to my 16-year old after she passes her driving test.


That's all I have for now. Please visit the Design Team Blog to be inspired by my Team Mates. Have a great weekend!

*I am entering this card into the 'ANYTHING GOES' challenge at Simon Says Stamp.*


Blessings~


 materials~

digital stamp: Flower Power Car(MelJen's Designs)
stamp set: Every Occasion(Close to My Heart)
card stock: Neenah Solar White  Lucky Limeade(Stampin' Up!)
patterned paper: Hello Summer Collection(Echo Park)
ink: Lucky Limeade(Stampin' Up!)
dies: Classic Circle Nestabilities(Spellbinders)
other: Orange Sorbet, Lemon Drop, Tourmaline, Crystal glitter(Martha Stewart Crafts) Clear Star Dust glitter pen(Sakura)  green brad(Doodlebug)  flower(Prima)  Copic Markers

Tuesday, March 26, 2013

Playing with Patterned Paper Again...

Hello Friends! Well, the Pattern Play class is over, but the good news is that, as with all of the Online Classes, students have unlimited access to the course materials. And, it's not too late to sign up for the class yourself.  Click HERE for more details.

The lesson from Day 4 focused on altering patterned paper. For my card, I used a technique shared by Shari Carroll. She scored the backside of her patterned paper, then folded the scores and sanded them to let the white core of the paper show thru. I was also inspired by Jennifer, who punched hearts from several patterned papers to scatter over her card.


I like how this one turned out. You can never go wrong with hearts in my book. For the sparkly hearts, I applied Crystal Effects first and then sprinkled glitter over top. I love the result! It's glittery, but shiny too. Really nice effect.

That's all for today. Thanks for visiting me.

Blessings~


materials~ 
stamp set: For Every Occasion(Close to My Heart)
card stock: Georgia Pacific White
patterned paper: Picadilly Collection(BasicGrey)
ink: Versamark(Tsukineko)
dies: Hearts(Sizzix)
punches: Heart to Heart, Owl Builder(Stampin' Up!)
other: Crystal Glitter(Martha Stewart Crafts)  Early Espresso Embossing Powder(Stampin' Up!)

Friday, March 22, 2013

New Release Friday!

Hello Friends! Today is Friday. You know what that means. New digital stamps in the MelJen's Designs Shop! Here they are...


 Cute! Cute! Cute! Let's get right to the cards, shall we? I have two to share with you...

The first one features that loveable little snail!

click to enlarge

I colored this little dude with Copic markers and then masked him off and stamped in some clouds and blades of grass. Just a note about masking. Before I print a digital stamp onto card stock, I first print the image onto regular printer paper. This way I can make sure it is the correct size for my dies. If I decide to do a technique that requires a mask, I cut the image out and put a bit of temporary adhesive on the back and use it to cover the colored image. I've tried the sticky notes and the special tapes, but I find that this works just fine for me. I save the cut-outs in an envelope, so I can use them again. After he was all colored, I sprinkled on two colors of glitter. I wanted him to look like he had a bit of moss on him, but I didn't want his shell to be entirely green. It's a really cool effect in real life.

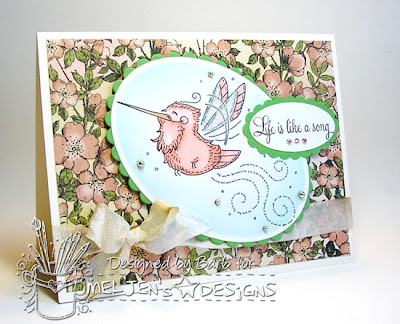
For this next card, I colored up the sweet Little Hummingbird.

click to enlarge

We have several hummingbirds visiting our yard these days. They are so cute. This little sweetie is colored with Copics. This is a really simple card. Not a lot of layers, because I wanted the background paper to show. I love this paper pad from Graphic 45. I've had it for a few Springs and I'm getting to the end of it now. Anyway, this little hummie looks right at home amongst all those flowers. I dusted on blue distress ink to give the feeling of 'sky'.

These stamps are available right now in the Shop. Please take a moment to visit the Design Team Blog to be inspired by my Team Mates.

Well, that's it for me. Thanks for stopping by!


Blessings~


materials~
digital stamps: Snail Mail, Little Hummingbird(MelJen's Designs)
stamps: Mailbox Greetings, Up, Up and Away, Birds of a Feather(Papertrey Ink)  Air Mail(Close to My Heart)
card stock: Cryogen Iridescent White  Neenah Solar White  Kraft, Melon Berry, Vintage Cream, New Leaf(Papertrey Ink)
patterned paper: Once Upon a Springtime Collection(Graphic 45)
ink: Soft Suede(Stampin' Up!)  Memento Bamboo Leaves(Tsukineko)  Broken China Distress Ink(Ranger)
dies: Classic Square, Scallop Square, Classic Oval, Scallop Oval Nestabilities(Spellbinders)
punches: oval, scallop oval(Stampin' Up!)  3/4" punch(EK Success) 
other: wrinkled ribbon(MemrieMare on Etsy)  Tiny Twinkles(Taylored Epressions)  Limeade, Crystal, Sugar Cube glitter(Martha Stewart Crafts)  Clear Stardust pen(Sakura)  gold bling(from my stash)  Copic markers
  

Sunday, March 17, 2013

Happy St. Patrick's Day!!

Hello Friends! Surprise! I have a card to share. I just had to color up the adorable St. Patrick's Cupcake that was newly released on Friday. I wanted to create a clean and simple card, just let the image be the star.

Here is what I came up with...

click to enlarge
This was such a fun image to color and I tried something new. It really doesn't show up well in this photo, but, after I colored the cupcake with Copic markers, I let it dry for a bit. Then I went back in and colored on some Twinkling H20's. I used a deep green and it added such a wonderful, shimmering sheen to my shadow areas. I love the way it looks! After I die cut the gold glitter paper, I weaved a bit of baker's twine thru the lacy loops and finished it off with a bow. SUPER simple card, with a lot of sparkle. I needed a little decoration for a spot in my dining room and this will be perfect!

If you celebrate St. Patrick's Day, I hope you have a good one! Thanks for dropping in today. I appreciate the visit.


Blessings~


materials~ 
digital stamp: St. Patrick's Cupcake(MelJen's Designs) 
card stock: Neenah Solar White(Simon Says Stamp) Tan Leather(GinaK Designs) 
paper: Recollections Gold Glitter(Michael's) 
ink: Honey Distress Ink(Ranger) 
dies: Classic Circle, Lacey Circle Nestabilities(Spellbinders) 
other: rhinestones(KaiserCraft) gold bling(from my stash) PeaPod Baker's Twine(The Twinery) Forest Green Twinkling H20's(Luminarte) Clear Star glitter pen(Sakura) Copic markers

Thursday, March 14, 2013

Thursday Challenge @ MelJen's!

Hello Friends! It's time for another Thursday Challenge on the MelJen's Design's blog. This one is just perfect for the upcoming celebration of St. Patrick's Day! The challenge this week is

"SHAM-ROCKIN' AROUND THE CLOCK!"
Just use green on your card! Easy Peasy!

Remember, that you must use a MelJen’s Designs image on your project in order to be included in the random drawing for FREE digital stamps. I hope you play along with us; I really enjoy looking at all the submissions and visiting your blogs. Have fun!


I chose to work with the Dancing Leprechaun. As usual, I printed two of the image. I don’t always make cards with both of the images; sometimes I just color them and put one away for another time. 

click to enlarge
Easel cards are easy and fun to make. They look so cute with their built in stands. I colored this little fella with Copic markers. Then die cut him and dusted on distress ink. I gave it a big blast of shimmer spray, too, because I wanted tons of sparkle. His buttons and buckles are colored with glitter pen, as is the bitty shamrock on his hat. And to add even more sparkle, I tucked in a shamrock that I die cut from glitter paper. I also matted the patterned paper with gold glitter paper. It’s a VERY sparkly card! For the inside of the card, I did some random stamping and added an Irish Blessing that I embossed in gold.


Fun, fun fun! Make sure you stop by the Design Team blog to be inspired by the other Team Members. Then choose a MelJen’s digital stamp and join in on the fun! Remember…everything is on SALE until March 17!

That’s all for me today. Thanks for stopping by.


Blessings~


materials used~ 
digital stamp: Dancing Leprechaun(MelJen's Designs)
stamp sets: Irish Blessings(Waltzing Mouse Stamps)
card stock: Neenah Solar White
patterned paper: The Stack 4(DCWV)
glitter paper: green, gold(Michael's)
ink: Old Olive, Lucky Limeade(Stampin' Up!)  Scattered Straw, Vintage Photo distress inks(Ranger)
dies: Deckled Edge Rectangle Nestabilities(Spellbinders)  shamrock(Sizzix)
punches: Modern Label, Word Window(Stampin' Up!)  Lace border(Martha Stewart Crafts)
other: Filigree detail gold embossing powder(Papertrey Ink)  gold brads(Making Memories)  ribbon(Offray)  yellow, green glitter pens(Sakura)  shimmer spray(Blessed Designs by B.)  Copic markers

Friday, March 8, 2013

New Release Friday!

Hello Friends! It's Friday and that means there are new digital stamps in the Shop for you today! And here they are...

Adorable, right? I sure think so! And yes, they are ON SALE! I chose to work with Sweet Dreams Moon.

click to enlarge

I printed my image on Cryogen white card stock. I used Ink Tense pencils to color him. I used them both wet and dry. The yellow is very bright and intense, perhaps more so than I would have liked, but, I decided to just go with it. After coloring the stars, I sprinkled on a bit of glitter. I love the moon and stars together, it’s just so cute! I added sparkly fluff to the pom-pon and I accented  the little “x’s” with a yellow glitter pen. I die cut the image and used an ink blending tool to sponge on distress ink, and then I adhered the focal to the card base using dimensional tape. I tried a new tape and it’s got a very low profile, so it is not as dimensional as I would like for it to be, but it’s stuck down tight now!

 
Lots of sparkle on this…I used glitter pen, bitty gems, glitter and the sparkly fluff has specks of glitter in it too. Fun stuff!

That is all I have to share today. Make sure you stop by the Design Team blog to be inspired by the other members.  Both of these new digital stamps are available in the Shop right now.

Thanks for stopping by! Have a great weekend!
Blessings~


materials used ~
digital stamp: Sweet Dreams Moon(MelJen’s Designs)
stamp set: Mixed Messages(Papertrey Ink)
card stock: Cryogen White(Inspiration Emporium)  Bashful Blue, Lucky Limeade(Stampin’ Up!)
patterned paper:  Super K stack(Brenda Walton)
ink: Lucky Limeade(Stampin’ Up!)  Antique Linen Distress Ink(Ranger)
dies: Classic Circle Nestabilities(Spellbinders)  Tiny Tags(Provo Craft)
punches: Doily Lace Border(Martha Stewart Crafts)
coloring medium: Ink Tense Watersoluble Pencils(Derwent)
other: Sugar Sparkly Fluff(Our Craft Lounge)  Lemon Drop Glitter(Martha Stewart Crafts)  Tiny Twinkles(Taylored Expressions)  Very Vanilla Ribbon(Stampin’ Up!)  Cuddly Friends Borders and Corners sticker stack(K&Company)  yellow glitter pen(Sakura)  gold thread(DMC) Ink Blending tool(Ranger)


Friday, March 1, 2013

New Release Friday!

Hello Friends! It's Friday and yes, there are new digital stamps in the MelJen's Shop today! Two cuties for you...

I decided to work with both of these guys. I wanted to use two different coloring media, so that is what I did. First up, is Bumble Bear Buzz...

click to enlarge
 On Bumble Bear Buzz, I used InkTense pencils. Let me just say, I am in LOVE with my InkTense pencils. Again, they can be used wet or dry. I printed the image on watercolor paper but that is really not necessary with these pencils because so little water is needed to activate the ink. I did heat set the image and let it sit over night before coloring it. I don't know if that keeps the image from smearing, but...it's just what I do. The key with InkTense is to use a very light hand. I applied a little color and then went over it with a waterbrush. I don't use a real wet brush, just damp enough to move the ink around on the paper. I worked on one section at a time, laying down a light layer of color. Then while that section dried, I moved on to other sections and repeated the same process. Then I went back and forth with this until I have the color I desire. Some of you have expressed a 'fear' of water coloring, but I tell you, with these pencils, you really can't go wrong...a little color and the smallest amount of water go a long way.  I added Crystal Effects to the hearts and he has a bit of sparkle from both loose glitter and a glitter pen. Now on to Bumble Bear Smile...

click to enlarge

I used Distress Inks on Bumble Bear Smile.  Those were really fun to use also. This process was a lot faster than the InkTense pencils. I printed this guy on water color paper, heat set and let it sit overnight, too.  The key with Distress Inks is to move very quickly, so the colors remain blendable-is that a word? I used a water brush for this technique. And I also used a Ranger craft sheet, where I "stamped out" a bit of color from each of the inks I wanted to use. What's neat about that, is that the inks stay wet and you can blend right on the sheet. Again, I applied my colors in layers and with the 'wet' ink, it's important to remember that where ever your brush touches first, will be the darkest and most intense color. With that in mind, I dipped my water brush into the ink, swiped off a bit of the excess onto scratch paper and then laid the color where I wanted the most shadow to appear. Then, I just pulled color from that and it gets lighter and lighter the more color you pull. So, it creates its own shadow. REALLY cool effect. Once my image was completely dry, I went back in with a dry paint brush and added a darker ink to deepen the shadows even more. I added glitter, glitter pen and Crystal Effects to this image, as well.

Here is a peek at the inside of this one...

I stamped the bitty bees and the skep in chocolate ink and added glitter pen to their wings. I'm a big bee lover, so when I see paper or stamps that feature bees, I try to snag them for my collection. I can't say that I have a favorite between the two cards...I like them both! The images are just the cutest!

**I am also entering this card into the ANYTHING GOES challenge at Simon Says Stamp.**

These guys are ready and waiting for you in the Shop today. As always, please visit the Design Team blog to see the projects the other Team Members have for you.

That's all for me today! Thanks for dropping in. Have a great weekend.


Blessings~


materials used~
digital stamps: Bumble Bear Buzz, Bumble Bear Smile(MelJen's Designs)
stamp set: Honey Bees(Papertrey Ink) bitty bees, skep, 'Bee Yourself' are from a CTMH incentive set, it had no name.
card stock: So Saffron, Chocolate Chip(Stampin' Up!)  Sweet Corn(GinaK Designs)
patterned paper: Sun Kiss Collection(Prima)
ink: Chocolate Chip(Stampin' Up!)  Chocolate, Honey(Close to My Heart)  Walnut Stain, Vintage Photo, Wild Honey, Scattered Straw, Forest Moss, Tattered Rose, Barn Door, Broken China, Pumice Stone Distress Inks(Ranger)
dies: Classic Oval, Oval Scallops Nestabilities(Spellbinders)
punches: Mini Scallop Circle(Martha Stewart Crafts)
other: Sugar Cube glitter(Martha Stewart Crafts)  Crystal Effects(Stampin' Up!)  chocolate pearls(Michael's)  InkTense Water Soluble Pencils(Derwent)  Clear Stardust glitter pen(Sakura)  Cappuccino Baker's Twine(The Twinery)

Tuesday, February 19, 2013

Birthday Card

Hello Friends! I hope everyone had an enjoyable weekend. Today I am sharing a birthday card I made for my mom. Today is her birthday, but we ambushed her on Sunday and spoiled her a little bit!

I used the triple time stamping technique on this one. It's a really easy technique to do, but it makes quite an impression.

click to enlarge


There is so much sparkle and glitter on this, but of course the camera doesn't pick it up. The little butterflies are covered in crystal glitter. I have had the crystal glitter for some time, but just recently started using it regularly. It's a clear glitter, no iridescence at all, so it doesn't change the color of the object that is glittered. It just adds loads of sparkle! I finished off the card with several blasts of shimmer spray.

materials used~
stamp set: Blooming with Kindness(Stampin' Up!)  Fancy Flourishes(Papertrey Ink)
card stock: Calypso Coral(Stampin' Up!)   Vintage Cream(Papertrey Ink)
ink: Calypso Coral(Stampin' Up!)   Vintage Cream(Papertrey Ink)
dies:Fancy Tags(Spellbinders)
punches: Butterfly(Martha Stewart Crafts)
ribbon: Very Vanilla(Stampin' Up!)
other: pearls(Michael's)  crystal glitter(Martha Stewart Crafts)


Thanks for dropping by!

 Blessings~